Showing posts with label Pegasus Hobbies. Show all posts

Saturday, April 14, 2012

Pegasus 1/48 Martian War Machine--WIP Part 5

Last time I showed a video of an early trial of the motorized heat ray. I've been a-workin' on it since then. Although I have made a little progress, this installment will mostly be confined to telling you that I'm an idiot and explaining why.

For starters, the circuit diagram I posted in Part 3 won't work.I drew it in haste, and when I started wiring, it became clear that the reversing switch doesn't reverse the motor. Here is the revised diagram.

When I put the CCFLs into the hull, I test fitted them repeatedly, grinding down the acrylic end blocks until they'd fit inside with the hull closed. You'd think a fellow sensible enough to do that would also test fit the motor, wouldn't you? Nope. After building the drive assembly and installing it in the upper hull, I finally decided it was time to see how it fit if I closed up the hull. Did it fit? Not quite. There are three round lights in the bottom of the hull--the force field projectors that levitate the ship--and these have cylinders that project into the hull. The motor and the rear one of these cylinders tried to be in the same place at the same time when I tried to close up the hull.

The hull assembled for test-fitting the drive assembly.
So I drilled new holes for the center post inside the hull, so I could rotate the drive assembly until the motor fit between the hull halves. Here's the hull assembled for test-fitting.

Sunday, April 1, 2012

Pegasus 1/48 Martian War Machine--WIP Part 4

Last post was pretty boring, since there wasn't anything to show but a crudely hand-drawn diagram. Since then I've made the support for the motor and gears and temporarily installed the drive system for a demonstration. (Don't look at the clutter on my workbench or it'll drive you mad as sure as getting face time with Cthulhu.) As you'll see in this video, that 1250:1 gear ratio is really necessary to get the heat ray projector to swivel at the stately pace you see in the 1953 movie.

Since last time I made a new support for the drive components from a scrap of 1/4" ABS. I drilled a large hole for the shaft of the heat ray projector and two small holes for the gear shafts, plus a clearance hole for the center post inside the hull and a recessed area for the motor. I installed the gears and everything fit. Hooray! Here are some pics of the drive system.

At left you see the upper hull with the cobra-neck heat ray sticking out, and perhaps you can tell that the bottom of the heat ray lines up with the gear on the right at the tip of my thumb. In the background you see the lower hull of the MWM, and part of an AMT Klingon battlecruiser, painted black and in need of restoration, that will be featured in a future post.

Here is a view of the drive train without the motor.The gear at the lower right (with the wires to the heat ray LED coming out of it) is the gear/pinion that I had to drill through (eliminating the pinion) to be able to slip it onto the shaft of the heat ray. It's still not secured, only press fit and none too tightly. On the left side of the ABS panel is a recessed area to support the motor. Don't mind my thumb; I injured it almost three months ago and it's still unsightly.

Here's the whole drive system so far. The gear shafts need to be superglued into the holes, the gears need to be secured so they don't fall off the shafts, and the motor is just lying there. It will be epoxied in place and strapped down. The worm that drives the first gear is superglued onto the shaft, at least, but the shaft is too long and also needs to be supported on the far end of the worm to reduce vibration.

Next time I'll have all that taken care of, and hopefully have those momentary pushbuttons installed to act as limit switches to prevent the heat ray from swiveling too far, plus all the requisite wiring to lead to the DPDT switch that will be outside the model.

Saturday, March 31, 2012

Pegasus 1/48 Martian War Machine--WIP Part 3

Previously on Martian War Machine WIP...

Not a lot of pretty pictures to show this time. I completely re-leafed the upper hull, since I was unhappy with the mottling that occurred due to my lack of control of the patina process. I did discover that there is something really simple that helps change copper from bright, almost white, to a duller reddish tone. Finger oil. Just rubbing your finger over the copper ages it a bit. The effect is subtle, but shouldn't be totally unexpected: after all, what happens to pennies? Aside from exposure to earth's atmosphere, all that happens to them is that people touch them. Most pennies don't get dipped in household cleaners or exposed to any other chemicals that aren't normally found on your bare hand. If experimentation doesn't reveal anything better for giving the copper a somewhat aged appearance, I will have to settle for this.

The heat ray projector swivels back and forth on the "real" thing and on the model as well. I'm taking advantage of this feature to motorize the MWM.

First, I chose the motor and reduction gears. The motor is a cheapo, a little can motor I picked up at Edmund Scientific years ago for 25 cents. It runs at something like 500 RPM 5000 RPM when 1.5 V is applied with no torque. I superglued some aluminum tubing onto the shaft to match the bore through the worm that will be used. This will turn a 50 tooth gear with a coaxial 10 tooth pinion, which in turn drives another of the same, which in turn drives a 50 tooth gear which is mounted to the hollow shaft of the base of the heat ray projector. I was originally going to put in a linkage from the shaft at the base of the heat ray to the third gear, like the push rod on a steam locomotive, to mechanically cause the heat ray to travel back and forth. This idea limited the travel of the heat ray to be less than 45 degrees from center.


A better idea came to me while I was nearly asleep (see circuit diagram at left). A momentary-off pushbutton can provide the feedback to prevent overtravel of the heat ray projector (which ought to be avoided because it is undesirable to twist the wires leading to the heat ray LED and because it would look silly for the heat ray to spin all the way around). The pushbutton will interrupt the current to the motor to prevent overtravel. A center-off DPDT switch will supply current to drive the motor in the desired direction, which is interrupted by the momentary pushbuttons. A simple diagram of the gearing is included. It also shows the stacked gear ratios needed to slow the motion of the heat ray projector down to 1/125 1/1250 of the RPM of the motor.

The plastic gears have, as near as I was able to measure, a bore diameter of .111", so in order to obtain appropriate diameter shafts, I ordered lengths of number 33 and 34 drill rod, at .112 and .110 diameter respectively, from McMaster. Good thing I ordered both to bracket the needed diameter: both were undersize (apparently McMaster got my order mixed up and sent 35 in place of 33), the larger drill rod measuring .110". I cut it to length and also drilled holes in a small piece of 1/4" ABS, spaced at about .592" to support the shafts holding the gears at the right distance from one another to prevent binding or slippage. Drilling precisely spaced holes is not something I am set up to do at home, and I got one good result out of three tries. I had wanted the gear shafts to be supported at both ends, but decided to settle. One of the leads on the motor needed to be resoldered, as well.

Next time: the motor and gear box all installed and working, and a video demonstration of the motion of the heat ray projector.

Saturday, March 24, 2012

Pegasus 1/48 Martian War Machine--WIP Part 2

Here's what I've been up to since last time. Aside from a bit of touch up (hard to apply leaf without missing spots, but you fix it by applying more adhesive and more leaf), what I did was to age the copper. The leaf is bright copper, which isn't the look of the MWM. I want a slightly tarnished look, like an old but not-too-disreputable penny. That's the look of the MWMs in the movie (although they do acquire weathering as the movie progresses. Exterminating the human race is dirty work).

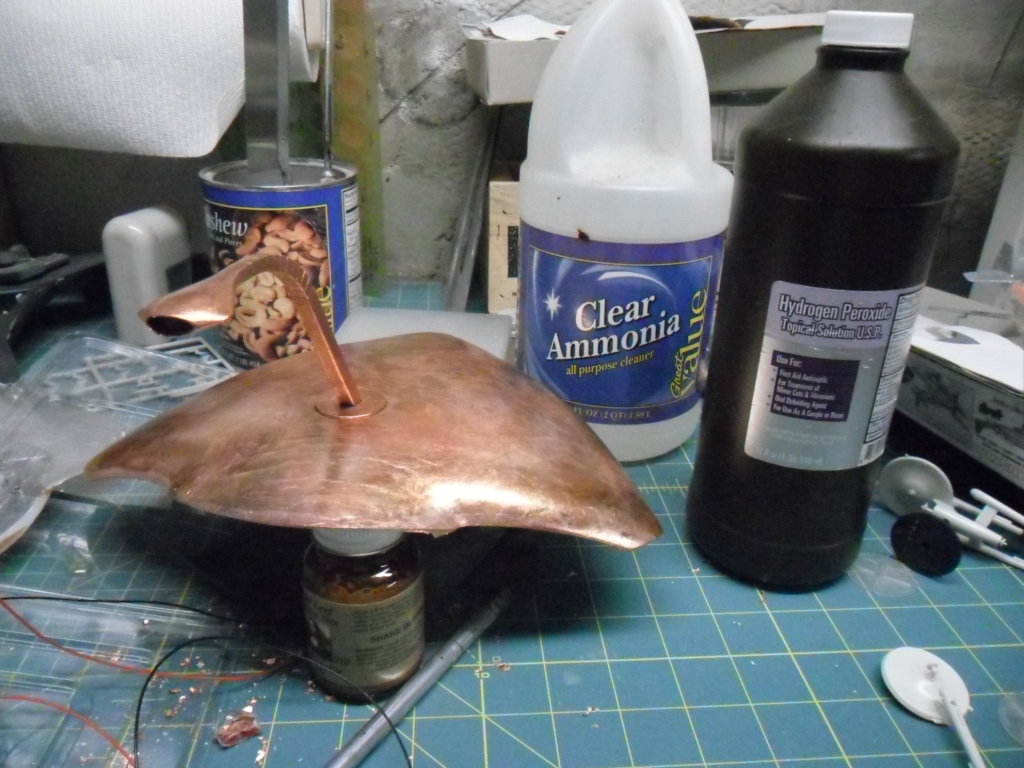
When copper tarnishes, it first forms Cu2O, which is reddish and gives old pennies their appearance. This is what I wanted, and you can get it by waiting. That's how pennies get it. I don't have the patience that a penny has, so I looked for methods of producing it. I found US Patent #6261953, which gives a lot more information than needed for ageing copper leaf, but tells just what chemicals you need. Luckily, they are ammonia and hydrogen peroxide, stuff practically everyone has. You mix these two chemicals and apply them to the copper. I first experimented on a new penny, and it quickly gained the appearance of an old penny. Here are pictures of what it did to the parts of the MWM that I have thus far copper leafed.
Before chemical treatment...
and after.


The difference in lighting makes it a little hard to see, but the copper is aged. Not excessively, but if you compare to the pics in the last post, you see the bright copper look is definitely gone now. Unfortunately, the effect can vary with the amount of exposure of the copper to the solution, and probably with a lot of other conditions that I don't have under control. For the heat ray projector, this isn't a problem, because it's pretty small. The upper side of the hull is another matter. It's like a billboard, and the variable amounts of tarnish lend it a mottled appearance, not what I wanted at all.

I'm thinking about ways to overcome the mottled appearance. If you've got any ideas, please leave a comment. Meanwhile, the lower hull need copper leafing and ageing, and the gears and motor need to be installed and the internal wiring completed so final assembly can take place.

Next time: motorization....

Friday, March 23, 2012

Pegasus 1/48 Martian War Machine--WIP Part 1

I started this kit about two years ago, and the project got stalled. It's the Martian War Machine from the 1953 classic War of the Worlds. Pegasus released this kit in 2009 and I had to have it right away. Unfortunately, I didn't seem to need to finish it right away. It's kind of an odd kit: their styrene is different from other manufacturers' and true to the subject it's lacking in detail, but the fit is amazingly precise. It does seem to be about spot-on perfect as far as accuracy is concerned.

Now I've got room on my workbench and I'm going full-steam with it till it's done. Posts of this work in progress will appear every day that there is something to post about it. Due to what I'm planning, some posts will include video embeds. The photos below aren't really that small; click to view them larger.

Here's a summary of what I've done so far. Since this kit will be lighted, the inside is completely lined with aluminum foil as a light block. Not just ordinary foil, it's the heavy kind used to seal nut containers.

Did I say lighted? I'm not just putting in LEDs. I want this thing to light up like it's going to zap you with its skeleton ray! To that end, I installed a pair of green 4" CCFLs. These have bulky clear resin mounting blocks at each end of the protective plastic tube that contains the bulb, and there was no way the lamp would fit inside other than to grind down the mounting block down to fit. Here at left is a shot with the CCFLs lit. Bright! The ballast won't be inside the MWM, so I'm running color coded wires out and down to the base. Incidentally, since I needed such fine wire (the CCFLs draw very little current, so it's okay to use fine wire. Besides, I experimented) I stripped it out of old phone wire. It's even color-coded.