I gave the model its first coat of primer. A relatively hard thing to fix is the loss of saucer edge detail near this RCS quad. I filled the gap with gel superglue and hit it with accelerant, then sanded and added more. I also puttied. After it's primered again, we'll see how much more work it needs so that the repair is unnoticeable.
Some areas don't need much help. Here you see only two little spots of putty on the saucer underside.
The edge of the engineering hull behind the saucer edge has a more serious defect, what appears to be a two-part mold problem. The area just needs the usual filling, sanding, primering ad infinitum.
The largest bubbles and some more two-part molding defects were on the warp nacelles. Nothing too bad.
Pretty much the same thing as the other pic of the engineering hull, eh?
Next time: all primered up and smooth and ready for painting. But it's going to have to wait two weeks till after vacation.
Reality is a concept firmly rooted in the imagination. This blog is a pretty much imaginary place for me to showcase my attempts to represent in reality some of the things that have come to live in my imagination.
Showing posts with label Star Trek. Show all posts
Friday, July 5, 2013
1/1400 Saber-class NCC-81623 USS Da VInci, Part 2
Thursday, July 4, 2013
1/1400 Saber-class NCC-81623 USS Da Vinci
Here's the beginning of a new project I hope will be brief. I acquired a Starcraft 1/1400 scale Saber. It's one of the new starship classes seen in Star Trek: First Contact. In the Starfleet Corps of Engineers books, most of the action takes place on one of these ships, USS Da Vinci NCC-81623, which this model will represent.
EDIT (28Feb2014): I've heard from another modeler who used Klean Strip on resin and it ate into the resin. Like the advice given on a lot of products, test on an inconspicuous area to make sure it's safe. This product also works really fast, so you should not have to leave it on long.
Since the kit was previously finished, the old paint had to go. The paint stripper really looks like vomit, but has a very different nasty smell.

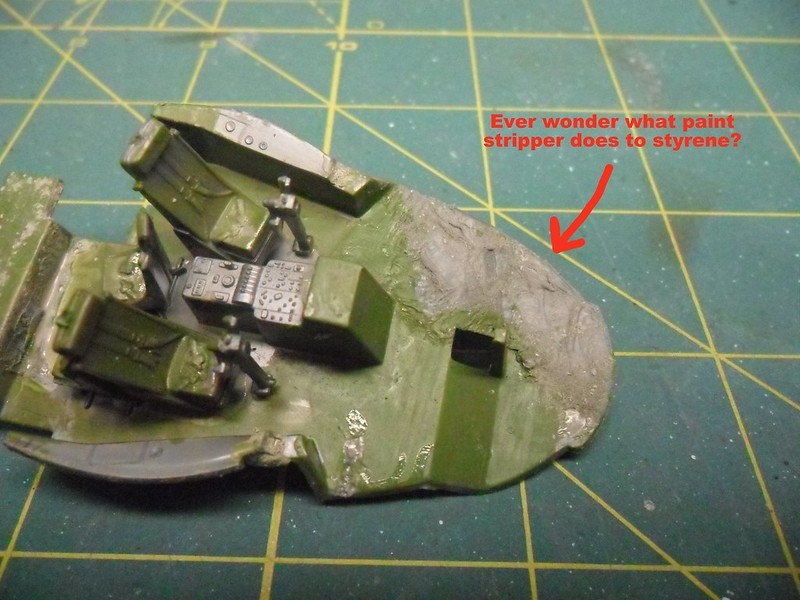
Incidentally, it was possible to use this stripper only because this model is resin. Out of scientific curiosity, I put some onto painted styrene. Here's the result:
Here's how it came out after soaking in stripper and scrubbing with a toothbrush dipped in lacquer thinner. Cleans up real nice. It was also possible to pop the nacelles off. I let the joint soak in acetone, then used a pair of slip-joint pliers and a piece of inner tube to pry off the nacelles without marring the surface.

It was bugging me that there are some symmetry problems with this kit. This is an older Starcraft kit and not quite state of the art any more. It was assembled just fine; in fact, there were locating pins for the nacelles. In this picture you can see where I had to sand down a panel that stuck out too far. Easy fix.
The starboard nacelle's pylon overlaps some lifeboats, and the port nacelle's front face is too far forward. Mostly this is an easy fix also, requiring just a bit of sanding. The mating surface to the pylon on the underside of the saucer, however, is a bit proud of the surface and needs to be carefully sanded to avoid wiping out the lifeboat detail. In fact, I had to re-establish some of this detail by scraping with an x-acto blade and using a scribing tool.
Here it is fixed. You can also see a dark stain on the underside of the saucer. Looking at it closely, I realized it's composed of paint that filled in thousands of tiny bubbles, and it won't be visible once it's primered. Another symmetry problem that needs to be addressed is the dogtooth detail on the leading edge of the saucer. A little bit of sanding will rectify this.
Next time: Primering and filling and sanding, oh my!
EDIT (28Feb2014): I've heard from another modeler who used Klean Strip on resin and it ate into the resin. Like the advice given on a lot of products, test on an inconspicuous area to make sure it's safe. This product also works really fast, so you should not have to leave it on long.
Since the kit was previously finished, the old paint had to go. The paint stripper really looks like vomit, but has a very different nasty smell.
Incidentally, it was possible to use this stripper only because this model is resin. Out of scientific curiosity, I put some onto painted styrene. Here's the result:
It strips the paint, then turns the plastic into taffy. Back to the Saber...
Here's how it came out after soaking in stripper and scrubbing with a toothbrush dipped in lacquer thinner. Cleans up real nice. It was also possible to pop the nacelles off. I let the joint soak in acetone, then used a pair of slip-joint pliers and a piece of inner tube to pry off the nacelles without marring the surface.
It was bugging me that there are some symmetry problems with this kit. This is an older Starcraft kit and not quite state of the art any more. It was assembled just fine; in fact, there were locating pins for the nacelles. In this picture you can see where I had to sand down a panel that stuck out too far. Easy fix.
The starboard nacelle's pylon overlaps some lifeboats, and the port nacelle's front face is too far forward. Mostly this is an easy fix also, requiring just a bit of sanding. The mating surface to the pylon on the underside of the saucer, however, is a bit proud of the surface and needs to be carefully sanded to avoid wiping out the lifeboat detail. In fact, I had to re-establish some of this detail by scraping with an x-acto blade and using a scribing tool.
Here it is fixed. You can also see a dark stain on the underside of the saucer. Looking at it closely, I realized it's composed of paint that filled in thousands of tiny bubbles, and it won't be visible once it's primered. Another symmetry problem that needs to be addressed is the dogtooth detail on the leading edge of the saucer. A little bit of sanding will rectify this.
Next time: Primering and filling and sanding, oh my!
Wednesday, May 15, 2013
KBoP Part 20
Quick update as I am frantically trying to get this done before leaving tomorrow to go to Wonderfest.
Here's the wings on. No disruptor cannons yet so it can't go "Pew, pew, pew!"

I have painted lots of KBoPs already. I don't need another one with red wings on the underside. Besides, that's a Romulan thing. Klingons' favorite color is green. Okay, red if it's spilling out of humans, but I mean ship colors.
The blank side of the landing gear doors will show, and Round 2 put nothing on them except ejector pin marks. So I hollowed them out a bit and added styrene detail before painting and weathering.
Here's the wings on. No disruptor cannons yet so it can't go "Pew, pew, pew!"

I have painted lots of KBoPs already. I don't need another one with red wings on the underside. Besides, that's a Romulan thing. Klingons' favorite color is green. Okay, red if it's spilling out of humans, but I mean ship colors.
The blank side of the landing gear doors will show, and Round 2 put nothing on them except ejector pin marks. So I hollowed them out a bit and added styrene detail before painting and weathering.
Sunday, April 28, 2013
KBoP Part 18
Last Sunday was Model Day with Jim Pugliese and Eric Longstreet of the Collective at Jim's house. Got a little done on it up to that point and that day, though most of it since last post has been electrical work and not much to look at. I've got the command pod closed up now, and no light leaks so far. The wires to supply electricity to the model come in through the two objects on the starboard side. See the second pic--hard to see because that part is in shadow, but if you know the Klingon Bird of Prey, then you know what I'm talking about. They seem like a likely function is power couplings when on the ground.Unfortunately, after last Sunday I realized how close Wonderfest is--it's the weekend of May 18-19! Yikes! Between freaking out over that sudden realization and the fact that I had a gazillion other things to do, I got absolutely nothing done on it till this evening. And what I got done was ungluing the lower part of the command pod, which wasn't fitting right, reattaching it, and puttying the seam. But the closing up of the hull has commenced.
Also stopped by Steve Neill's hangout. This evening was the first time the hangout was in operation, and I guess it's a work in progress for everyone to figure out how this technology works. I participated as best I could with no mic or webcam, which is to say little at all, though I shared one of these pics. We'll see more of how it works on coming Sundays.
Sunday, April 7, 2013
KBoP Part 17
![]() |
| Studio model of Klingon Bird of Prey |
Like I said, there needed to be more detail in other more visible parts of the ship, and one area that needed help was the shallow opening full of wiring or plumbing on the top rear of the command pod. At right, you see what I'm talking about on the real thing. I didn't attempt to recreate the studio model, but by the end you'll see what I did do to improve the detail on this area of the kit.
The kit detail is skimpy here, so I decided to cut it out and back up the hole with an insert loaded with detail.Cutting out the hole was pretty easy. As easy as Cortez burning his ships. No turning back now!

The plastic is pretty thick for the scale so I hogged out the surrounding area to make it look like a thin shell. I slopped on black paint in order to...
...transfer the impression of the opening to this sheet styrene backing. Actually, it's two layers cemented together. I held it in place to make it conform to the shape of the inside of the hull, and when it came out it was permanently formed into about the right shape.
Here's the blank styrene backing held in the opening.

I added wire, solder, and styrene shapes to fill in the area of the backing that would fit in the opening, painted it red-brown with a grimy black wash and dark yellow drybrushing.

Then installed it with 1-minute epoxy.

And here's the prize in the box. It's jazzed up with a bit of fiber optic lighting.
Labels:
1/350,
AMT,
Klingon,
lighting,
scratchbuild,
Star Trek,
superdetailing,
WIP
Saturday, April 6, 2013
KBoP Part 16
Another mini-update. The airlock chamber that exits through the top hatch in the forward hull is now installed. And populated. Er, Klingonated. There are two Klingons in there. In the first picture, there's a Klingon climbing the ladder. In the second, you can see another Klingon standing just inside the inner hatch. These are Tamiya 1/350 sailors (well, figures; the only thing that makes them sailors is that they are made to go with 1/350 ship models). I painted them to look like Klingons, which didn''t take much as they are two tenths of an inch tall, or 5mm. The guy on the ladder needed to be bent up a bit to get him to be in about the right pose.You might also notice the floor texture in the top photo, and the light green color of the floor beyond the inner hatch in the lower photo. The texture is fine mesh superglued to a disk of styrene, and I chose the light color simply because otherwise you couldn't see a darn thing in there. Now it needs the hatch on top, the rest of the lighting installed, and the upper and lower hull halves to be glued together--with wires sticking out to connect to an external power supply.
Labels:
1/350,
AMT,
Klingon,
Round 2,
scratchbuild,
Star Trek,
superdetailing,
WIP
Wednesday, April 3, 2013
KBoP Part 15
Just a quick update. I had an hour before bed to do some stuff I thought about to the airlock chamber under the hatch. It made sense for the interior door to have the same sort of control panel as the one at the top of the boarding ramp. So I made another one with 0.25mm fiber optic threaded through a tiny styrene polygon with holes drilled with a #80 bit. The control panel will connect to the same red, yellow, and green blinking LEDs as the other one. I also drilled out holes for lighting fixtures near the top of the chamber and threaded fiber optic through those, which will connect to warm white LEDs in the forward hull. I put it all together with 1-minute epoxy, plus a bit of styrene tubing to keep the control panel from wobbling. Then a bit of paint. It is going to be a pain to put this all together with fiber optic connecting parts in the top and bottom hull halves, but I will manage somehow.
Sunday, March 17, 2013
SRS Prototyping Figure: Mirror Universe Col. Green
Scott Spicer of SRS Prototyping has his Mirror Universe Col. Green figure out now. You may remember the character from the TOS episode "The Savage Curtain" (and the Star Trek: Enterprise episode "Demons"). The story is he's the emperor of Earth around the mid 21st century, but in the Mirror Universe. He's a genius--he invented the shield generator he's wearing on his back--and he's still evil. I'd expect his alternative actions gave rise to the mirror universe.
The figure stands 4.25" tall, which is about 1/18 scale if we allow Col. Green is over six feet tall, which seems probable since he's genetically superior. (I'm over six feet tall myself, so I should know!) He's molded with a separate head, which can be posed, and right arm holding a space helmet, which cannot. His Imperial dagger and officer's sword are also molded separately, and a base is provided with the Imperial logo laser etched by Laserfire Creations. The whole thing is $16 plus shipping.Saturday, January 26, 2013
KBoP Part 12
Previously on Klingon Bird of Prey...
Here's a demonstration of the lighting effects I've installed so far in the Klingon Bird of Prey. It's engine and warp core lighting, and lighting to a panel next to the door at the top of the entry ramp.
The first part I did was the the LED and fiber optic lighting for the panel next to the door at the top of the entry ramp. (Actually, it required rework recently. My soldering is just awful, and it was working intermittently. Now it's fixed.) The green and yellow ones are flashing LEDs and they're in parallel. The red one is in series with them, so if either of them lights, it should light too. Problem right now is that the 9V battery powering so much lighting it can't quite keep up with the load, so there's only enough current to light the red LED when both the green and yellow LEDs are lit. There's a single strand of 0.25mm fiber optic coming out of the top of each LED to illuminate the panel next to the door at the top of the boarding ramp. Neither you nor I understand the significance of these flashing lights, but I assure you they are perfectly intelligible to Klingons.
Also lit in part with fiber optic is the warp core. I say "in part" because the hole the fiber optics pass through is a bit oversized and the red and blue LEDs are right above it. As with the other LEDs, I drilled holes into them and stuck fiber optic in with one-minute epoxy. I am given to understand that cyanoacrylate glue is destructive to fiber optic. Because my supply of fiber optic is low, I have not yet verified this, even though I love destructive testing. By the way, you can safely drill holes pretty deeply into LEDs since they are mostly clear acrylic lens. The actual diode that lights up is tiny and you can see from looking at the side that it's near the bottom.
You can see the blue and red illumination of the warp core is flickering. This is because the two blue LEDs and one red LED are in series, respectively, with two flickering yellow LEDs that I scavenged from LED candles I bought at the dollar store, three for a dollar. The yellow LEDs provide part of the glow for the upper and lower sections of the engine. I think the flickering is a cool effect and is prominent in onscreen appearances of the Klingon Bird of Prey.
Another reason for the flickering yellow LEDs is to supplement the main illumination for the engine provided by 12 warm white LEDs. My initial impression of the engine lighting effect watching Star Trek III was that it was a pulsing effect. I happened to find a pretty cool string of mini Christmas lights at Walmart, which has 36 surface mount warm white LEDs on lacquered wire, with a battery power supply that has three settings: steady on, blink, and phase. The phase setting slowly ramps up, then back down again, which is pretty much the effect I wanted, except that it goes all the way off, which I didn't want it to do. That's one reason I supplement it with the flickering yellow LEDs.
The string of warm white LEDs is wrapped around a couple pieces of popsicle stick. I understand they're called iced lollies elsewhere in the English-speaking world. The warm white LEDs and their effects board are supposed to be powered by three AA batteries. Instead the effects board will get 5V from a 78L05 voltage regulator, which is how it's breadboarded right now. I figured the LEDs and the effects board were probably engineered with at least enough factor of safety that they could handle 5V, and indeed they can, so a 78L05 voltage regulator is dropping the 9V down to 5V. This way, the lighting can all run from a single 9VDC power supply, which makes it simpler and prevents circuits from getting the wrong voltage. The 78L05 is big enough for the job since the effects module is only drawing about 60mA.
I've stripped the lacquer off the ends of the wires of the remaining warm white LEDs and stuck them into the breadboard in series with a resistor to test out the planned interior lighting and navigation lights. Actually, it won't require all the remaining LEDs, just about a dozen of them. These LEDs are all in parallel sharing one limiting resistor--I guess in violation of conventional wisdom, but I won't get into the issues here. I already installed 1.0mm fiber optic in the wings for the headlights--the KBoP Owners' Manual calls them something else, but they sure look like headlights to me.
There are a few bits of lighting to add to this. A red LED will light up the two vents under the front of the main hull, and the navigational deflector/torpedo launcher needs lighting, but all that will be constant lighting. So it's not too much more work, and I'll be able to close up the hull.
Next time: more progress, some of it according to plan...
Here's a demonstration of the lighting effects I've installed so far in the Klingon Bird of Prey. It's engine and warp core lighting, and lighting to a panel next to the door at the top of the entry ramp.
The first part I did was the the LED and fiber optic lighting for the panel next to the door at the top of the entry ramp. (Actually, it required rework recently. My soldering is just awful, and it was working intermittently. Now it's fixed.) The green and yellow ones are flashing LEDs and they're in parallel. The red one is in series with them, so if either of them lights, it should light too. Problem right now is that the 9V battery powering so much lighting it can't quite keep up with the load, so there's only enough current to light the red LED when both the green and yellow LEDs are lit. There's a single strand of 0.25mm fiber optic coming out of the top of each LED to illuminate the panel next to the door at the top of the boarding ramp. Neither you nor I understand the significance of these flashing lights, but I assure you they are perfectly intelligible to Klingons.
Also lit in part with fiber optic is the warp core. I say "in part" because the hole the fiber optics pass through is a bit oversized and the red and blue LEDs are right above it. As with the other LEDs, I drilled holes into them and stuck fiber optic in with one-minute epoxy. I am given to understand that cyanoacrylate glue is destructive to fiber optic. Because my supply of fiber optic is low, I have not yet verified this, even though I love destructive testing. By the way, you can safely drill holes pretty deeply into LEDs since they are mostly clear acrylic lens. The actual diode that lights up is tiny and you can see from looking at the side that it's near the bottom.
You can see the blue and red illumination of the warp core is flickering. This is because the two blue LEDs and one red LED are in series, respectively, with two flickering yellow LEDs that I scavenged from LED candles I bought at the dollar store, three for a dollar. The yellow LEDs provide part of the glow for the upper and lower sections of the engine. I think the flickering is a cool effect and is prominent in onscreen appearances of the Klingon Bird of Prey.
Another reason for the flickering yellow LEDs is to supplement the main illumination for the engine provided by 12 warm white LEDs. My initial impression of the engine lighting effect watching Star Trek III was that it was a pulsing effect. I happened to find a pretty cool string of mini Christmas lights at Walmart, which has 36 surface mount warm white LEDs on lacquered wire, with a battery power supply that has three settings: steady on, blink, and phase. The phase setting slowly ramps up, then back down again, which is pretty much the effect I wanted, except that it goes all the way off, which I didn't want it to do. That's one reason I supplement it with the flickering yellow LEDs.
The string of warm white LEDs is wrapped around a couple pieces of popsicle stick. I understand they're called iced lollies elsewhere in the English-speaking world. The warm white LEDs and their effects board are supposed to be powered by three AA batteries. Instead the effects board will get 5V from a 78L05 voltage regulator, which is how it's breadboarded right now. I figured the LEDs and the effects board were probably engineered with at least enough factor of safety that they could handle 5V, and indeed they can, so a 78L05 voltage regulator is dropping the 9V down to 5V. This way, the lighting can all run from a single 9VDC power supply, which makes it simpler and prevents circuits from getting the wrong voltage. The 78L05 is big enough for the job since the effects module is only drawing about 60mA.
I've stripped the lacquer off the ends of the wires of the remaining warm white LEDs and stuck them into the breadboard in series with a resistor to test out the planned interior lighting and navigation lights. Actually, it won't require all the remaining LEDs, just about a dozen of them. These LEDs are all in parallel sharing one limiting resistor--I guess in violation of conventional wisdom, but I won't get into the issues here. I already installed 1.0mm fiber optic in the wings for the headlights--the KBoP Owners' Manual calls them something else, but they sure look like headlights to me.
There are a few bits of lighting to add to this. A red LED will light up the two vents under the front of the main hull, and the navigational deflector/torpedo launcher needs lighting, but all that will be constant lighting. So it's not too much more work, and I'll be able to close up the hull.
Next time: more progress, some of it according to plan...
Thursday, January 3, 2013
KBoP, Part 11
Previously on Klingon Bird of Prey...
With the end of the Fall semester and the holidays, I was a bit distracted from this project. And I was kind of sick of it and started preparation for some other projects, like a 1/35 Sd.Kfz.6 halftrack and scratchbuilding a 1/1400 scale Golden Gate Bridge. But on New Year's Day I got back to work on the Klingon Bird of Prey. I did it because I thought I ought to, but once I was at it my heart leapt with joy. This is a fun project!
I've finished boxing in the landing gear bays and detailing and painting them, but they'll have lighting in them before the hull is closed up. I've also been starting the painting of the exterior. I'm not trying to replicate any particular filming miniature or onscreen KBoP, just making it look good to my eye with a layered brush job. The painting/weathering style is partly based on armor modeling, and partly on railroad modeling, since those are the two types of modeling with the most extreme weathering. I want to make this ship look like the Klingons would never have come up with the idea of a car wash.
Here is the engine lighting effect with the mini Christmas lights temporarily installed.
Here is the lighting effect of the panel next to the door at the top of the boarding ramp. It's lit with 0.25mm fiber optic, and a small board of LEDs I soldered up. Green and yellow are in parallel and flash, and a red LED is in series with them so it lights up if either of the others does. The flashing LEDs have nearly the same frequency and go in and out of phase, which gives the effect a little visual interest.
Next time: more lighting...
With the end of the Fall semester and the holidays, I was a bit distracted from this project. And I was kind of sick of it and started preparation for some other projects, like a 1/35 Sd.Kfz.6 halftrack and scratchbuilding a 1/1400 scale Golden Gate Bridge. But on New Year's Day I got back to work on the Klingon Bird of Prey. I did it because I thought I ought to, but once I was at it my heart leapt with joy. This is a fun project!I've finished boxing in the landing gear bays and detailing and painting them, but they'll have lighting in them before the hull is closed up. I've also been starting the painting of the exterior. I'm not trying to replicate any particular filming miniature or onscreen KBoP, just making it look good to my eye with a layered brush job. The painting/weathering style is partly based on armor modeling, and partly on railroad modeling, since those are the two types of modeling with the most extreme weathering. I want to make this ship look like the Klingons would never have come up with the idea of a car wash.
Here is the engine lighting effect with the mini Christmas lights temporarily installed.
Here is the lighting effect of the panel next to the door at the top of the boarding ramp. It's lit with 0.25mm fiber optic, and a small board of LEDs I soldered up. Green and yellow are in parallel and flash, and a red LED is in series with them so it lights up if either of the others does. The flashing LEDs have nearly the same frequency and go in and out of phase, which gives the effect a little visual interest.
Next time: more lighting...
Monday, December 3, 2012
KBoP Part 10
Previously on Klingon Bird of Prey...
Here's a bit of progress since last week. I put the landing gear bay back in with a lighting module. You can't really see it in this picture, so I'll discuss it in a future post. The lighting uses LEDs and fiber optic to make a console next to the door have blinking lights.
What you see at right is the band around the engine recess, which is like that going around the outer part of the hull. I settled on making it from Evergreeen styrene shapes.
Here is the lower glowing engine part, made from the bottom of the clear kit part, plexiglas, and styrene strips. I keep some of that Plastruct cement with the orange label that works on any combination of styrene, ABS, and acrylic. It barely attacks acrylic compared to styrene, but it does the job.
Here's a bit of progress since last week. I put the landing gear bay back in with a lighting module. You can't really see it in this picture, so I'll discuss it in a future post. The lighting uses LEDs and fiber optic to make a console next to the door have blinking lights.
What you see at right is the band around the engine recess, which is like that going around the outer part of the hull. I settled on making it from Evergreeen styrene shapes.
Here is the lower glowing engine part, made from the bottom of the clear kit part, plexiglas, and styrene strips. I keep some of that Plastruct cement with the orange label that works on any combination of styrene, ABS, and acrylic. It barely attacks acrylic compared to styrene, but it does the job.
Friday, November 23, 2012
KBoP Part 9
Previously on Klingon Bird of Prey...
Here's a little update since I got back to work after a couple weeks away from it. The glowing engine part will have the separation between the upper and lower halves, so here it's being cut in half using a razor saw.
Here's a view of into the engine area on the studio model. (For a higher resolution version of this and other pictures of the KBoP studio model, check out Modelers Miniatures and Magic and enter "Klingon Bird of Prey studio model" in the search box.) As you can see, the band of dentil molding (what else should I call it?) between the upper and lower hull also extends into the engine area. Notice too, this determines the vertical positions of the glowing engine parts.
Here's the band of dentil molding I made to fit into the engine recess. It's Evergreen styrene: 3/16" channel with strips of corrugated siding.* Not a perfect match but close. To create the opening for the band, I cut the part flush using a router. This separation band will create a bit of a problem: modelers who modify the clear part to add the separation invariably end up with the separation too high and the gap too narrow. My modification will have to compromise elsewhere so the gap comes out in the right place. Part of the problem is the lower hull on the kit isn't deep enough in the first place.
*I had tried to cast a copy of the kit detail by pressing part 3 or 4 into modeling clay and pouring polyurethane resin in there, but it came out foamy and was thus unusable. Maybe my resin is past its shelf life.
Here's a little update since I got back to work after a couple weeks away from it. The glowing engine part will have the separation between the upper and lower halves, so here it's being cut in half using a razor saw.
*I had tried to cast a copy of the kit detail by pressing part 3 or 4 into modeling clay and pouring polyurethane resin in there, but it came out foamy and was thus unusable. Maybe my resin is past its shelf life.
Tuesday, October 9, 2012
Klingon Bird of Prey, continued (Part 7)
Since last time... This scratchbuilt stuff needed a coat of paint to pull it together, so here's a look at it. The main interior color is Polly Scale Panzer Red-Brown with a wash of Grimy Black and dry brushed with their Panzer Dark Yellow mixed with white. Of all the paints I've used, Polly Scale acrylics are about my favorite for brushing. This dull brick red fits into the Klingon palette of colors, and it contrasts with the green that will be the predominant exterior color. The warp core is Testors Gunmetal acrylic.
Monday, October 1, 2012
Klingon Bird of Prey, continued (Part 6)

It's been a while since the last post, but I've been a-workin' on it.
Let's back up a bit. Here's how it looked earlier this evening.
Wednesday, September 12, 2012
Klingon Bird of Prey Revisited (Part 5)
Since last time I've been adding detail to the whole area of the boarding ramp and lnading gear. Here's a view of the underside showing the new ramp.
Another view of the ramp. Maybe you can see the cool tread pattern. No?
How about now?
Okay, you can definitely see the tread pattern here! I did it by cutting Evergreen scribed sheet. Some has grooves with .025" spacing and some .020" spacing. The finer spaced sheet I cut on an angle so the ends of the grooves would line up with the wider spaced grooves of the center strip.
Another view of the ramp. Maybe you can see the cool tread pattern. No?
How about now?
Okay, you can definitely see the tread pattern here! I did it by cutting Evergreen scribed sheet. Some has grooves with .025" spacing and some .020" spacing. The finer spaced sheet I cut on an angle so the ends of the grooves would line up with the wider spaced grooves of the center strip.
Wednesday, September 5, 2012
Klingon Bird of Prey Revisited (Part 4)
Just cleared the decks to get back to this project: the Round 2 reissue of the AMT Klingon Bird of Prey. It's optional, but there was no question about displaying this baby in the landed configuration. It's too cool! I had one bit of cleanup that had to get done first: I got carried away cutting one of the windows open and had to fix it. Just a bit of sheet styrene. Yikes, it's been a while since I worked on this. Last post was May 5--that was four months ago!

I'd been thinking about what to do with this kit--it needs a bit of extra detailing. One thing I'm sure ought to be in the area where that ramp comes down is the warp core. I'd expect it could be jettisoned through the bottom of the hull, and for that matter, out the opening where the ramp is. If there was an imminent warp core breech, they'd open the ramp or just jettison it and then blow that sucker before the matter and antimatter meet. The passageway where the ramp comes down is almost exactly 1/2 inch wide (14 feet in 1:350 scale). So if the warp core is there, it's probably about 14 feet wide. Sounds like a good size. Also, Klingon stuff is very angular with lots of triangles and hexagons. The base of the warp core is a hexagonal piece of Sculpey I formed inside a 15/32" socket. Makes a nice neat shape.
It needed some kind of dome, so I scavenged a piece off some old blinds. It's clear, so I can add lighting effects inside it. I also added Evergreen channel to the sides. It looks like rails that the warp core would slide in and out on for installation and removal. (Or emergency jettisoning! Whee!) There's a beveled edge in the passageway so I cut a little off the warp core so it can sit in place. I also cut slots in the side walls for the channel on the sides of the core to fit in. I forgot to take a picture of the warp core installed. Well, it fits and next time there will be a pic of that. Plus cleanup of the slots and a whole lot of detailing. Klingon warp cores must have enough plumbing all over them that they look like a plate of spaghetti. And the whole interior of the landing gear bay and entryway needs gobs of detail, too. Some of this will come next time.

I'd been thinking about what to do with this kit--it needs a bit of extra detailing. One thing I'm sure ought to be in the area where that ramp comes down is the warp core. I'd expect it could be jettisoned through the bottom of the hull, and for that matter, out the opening where the ramp is. If there was an imminent warp core breech, they'd open the ramp or just jettison it and then blow that sucker before the matter and antimatter meet. The passageway where the ramp comes down is almost exactly 1/2 inch wide (14 feet in 1:350 scale). So if the warp core is there, it's probably about 14 feet wide. Sounds like a good size. Also, Klingon stuff is very angular with lots of triangles and hexagons. The base of the warp core is a hexagonal piece of Sculpey I formed inside a 15/32" socket. Makes a nice neat shape.
It needed some kind of dome, so I scavenged a piece off some old blinds. It's clear, so I can add lighting effects inside it. I also added Evergreen channel to the sides. It looks like rails that the warp core would slide in and out on for installation and removal. (Or emergency jettisoning! Whee!) There's a beveled edge in the passageway so I cut a little off the warp core so it can sit in place. I also cut slots in the side walls for the channel on the sides of the core to fit in. I forgot to take a picture of the warp core installed. Well, it fits and next time there will be a pic of that. Plus cleanup of the slots and a whole lot of detailing. Klingon warp cores must have enough plumbing all over them that they look like a plate of spaghetti. And the whole interior of the landing gear bay and entryway needs gobs of detail, too. Some of this will come next time.Monday, July 30, 2012
Tetryon Parts Upgrade for Enterprise-D
| Old upgrade part test-fit. |
Finally, June 29 he offered the piece for sale. I ordered one immediately, in clear resin with matching decals (it's available in opaque resin as well, and decals are optional). I've got the clear kit, and plan to use the kit's aztec decals. The kit decals (art by Jim Small of EIMB) are made to fit the kit, so if you correct an inaccuracy, you'll need a corrected decal as well!
It arrived in the mail July 17. I got out the 1701D kit and assembled the sides of the neck (parts 5 & 6) to test fit the replacement part. (Note: the part replaces the back of part 3, which is the back of the neck and top of the battle head, or the mating surface to the saucer section.) Pat had been candid in his posts on SSM forum (here's the thread) about the fact that his part was thin and might warp. Well, it did. Mostly I think the part was squashed flat in the mail, since it was shipped in a padded envelope. The part has a boxlike structure on the inside of the impulse engine, and that was crushed, though it could be rebuilt easily with sheet styrene. The worst problem, though it was the most subtle, was a wavy distortion of the area where the neck blends to match the curve of the saucer, most pronounced above shuttlebay 2. I wasn't sure I could fix that as easily.
| Old (top) and improved upgrade parts. |
| New upgrade part test-fit. |
| New upgrade part test-fit. |
And I can definitely recommend Tetryon Parts after this experience.
PS: July 31, 2012. Now my part is perfect!
I dipped the part in boiling hot water for a minute, draped it over the other neck parts holding it in place with my fingers, then dipped the whole assembly into icewater. The clear resin is floppy like a sheet of rubber at 212 F. I'd recommend not getting the water that hot--maybe just the temperature of hot bathwater.
The flattening of the part wasn't too bad in the first place--it would have stayed in place with CA or epoxy--I just wanted to assemble it without putting any stress on it.
Subscribe to:
Posts (Atom)