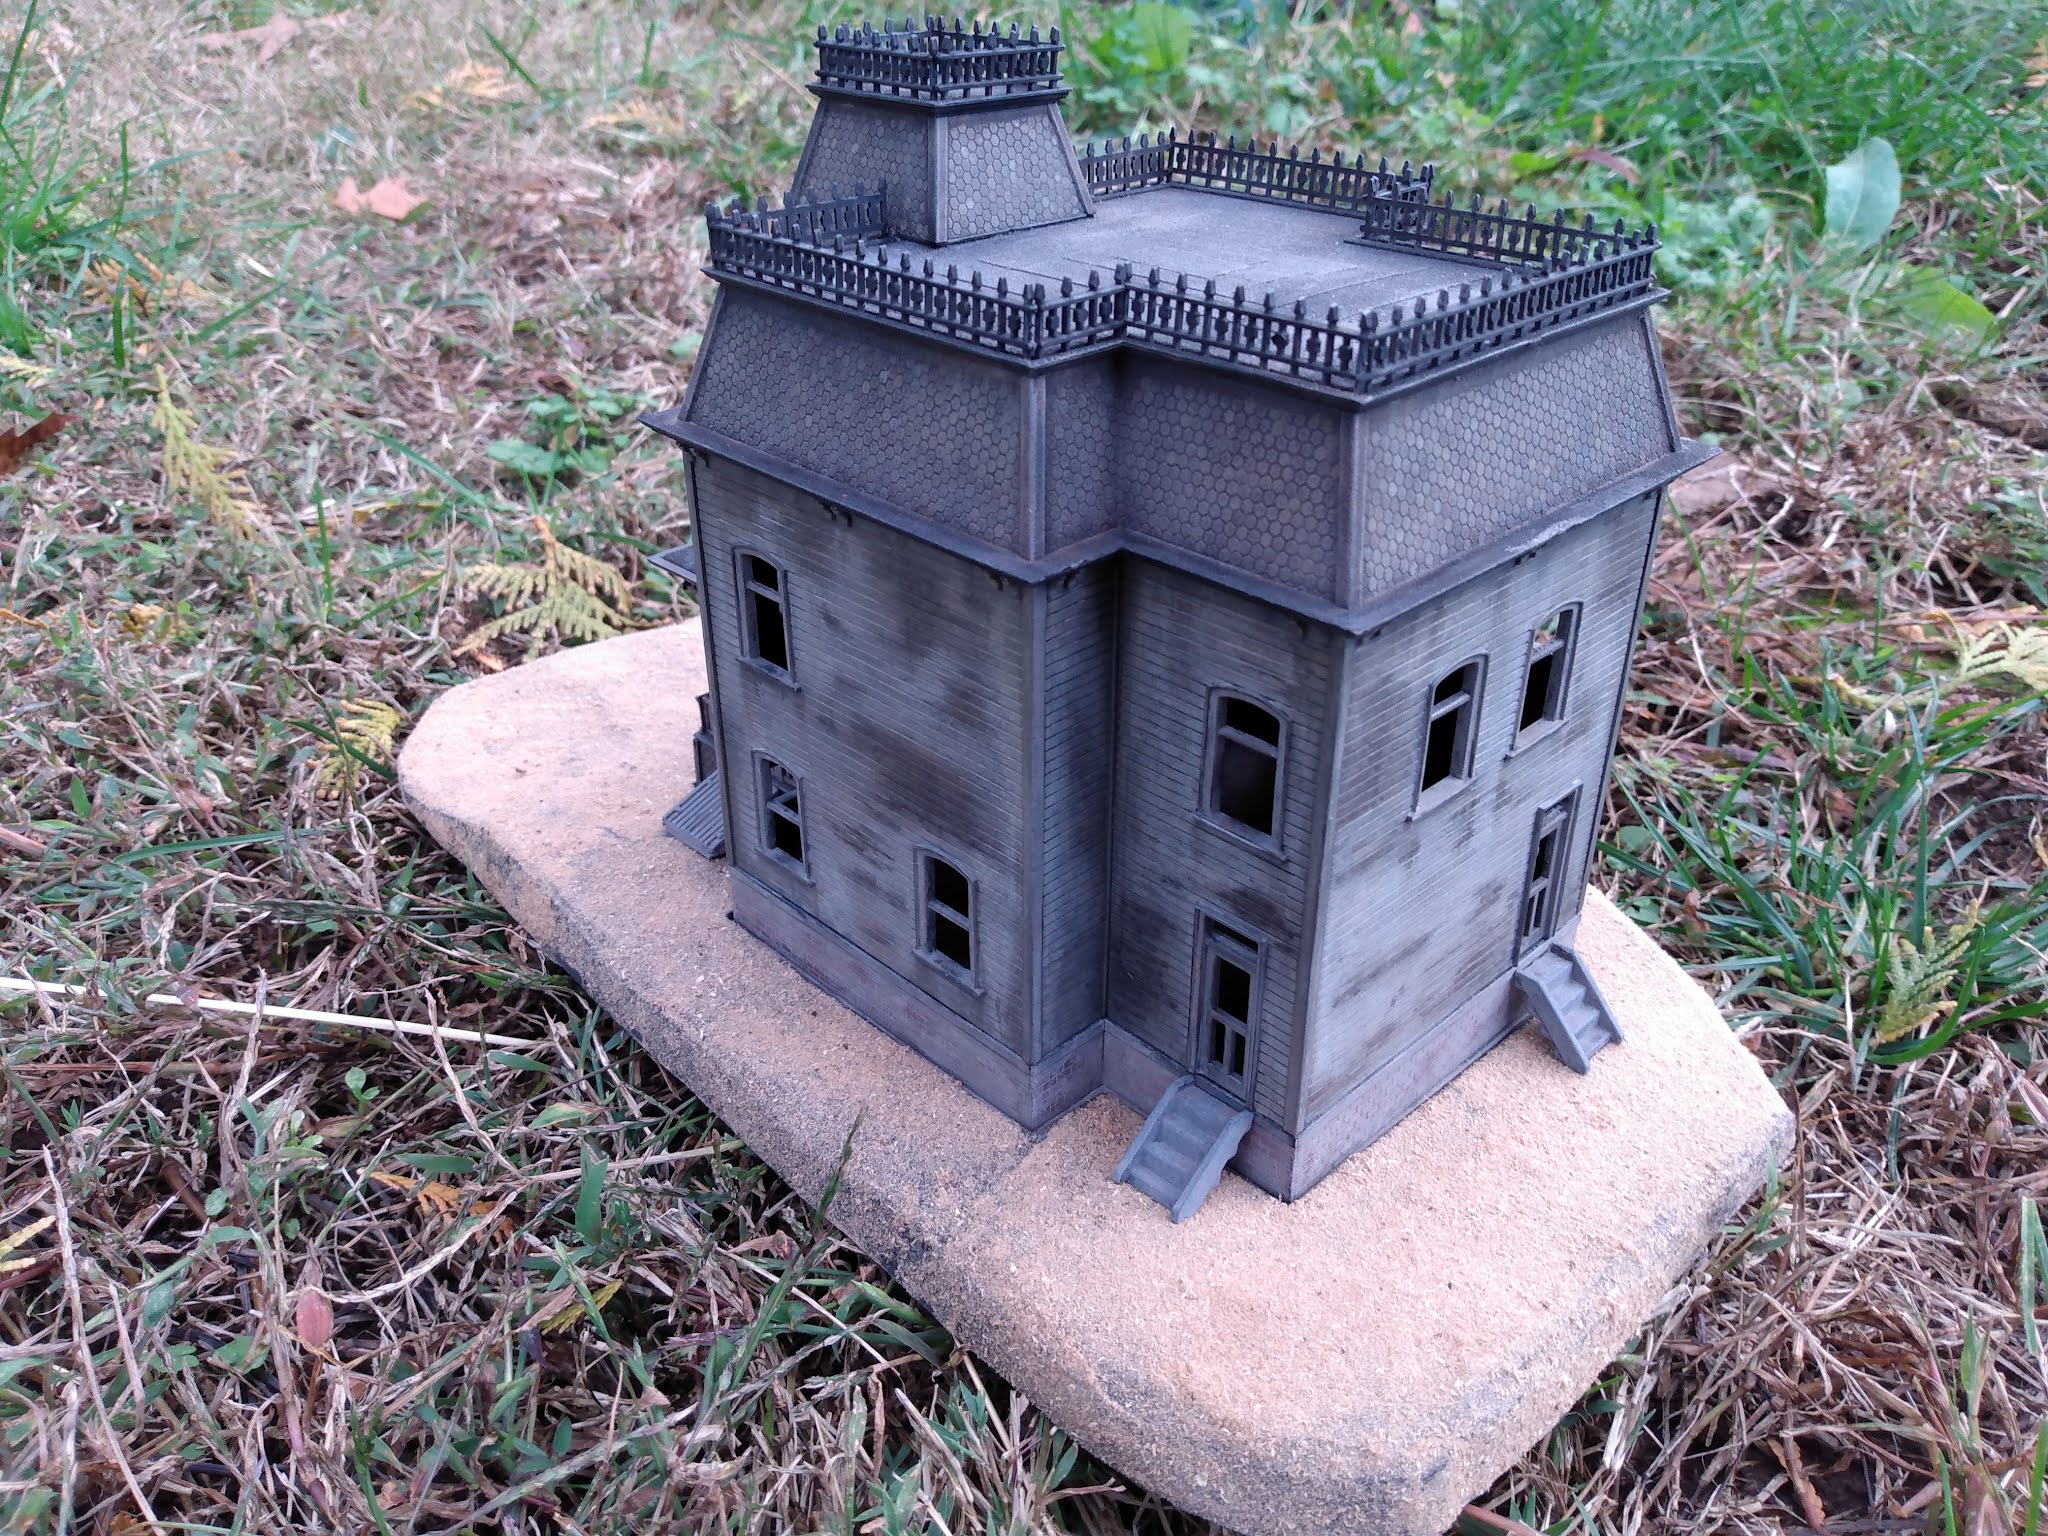
I provisionally called this model done today, since it's Halloween and the trick or treaters were going to start coming soon, and it's a spooky house model. It's the Polar Lights "House on the Hill" previously released as the "Bates Mansion" from the movie Psycho. I don't care particularly about it being the house from the movie, but I was nuts for haunted houses as a little kid, so I built it all decrepit looking with many layers of weathering. There are more things I want to do to this, but they'll have to wait.
Reality is a concept firmly rooted in the imagination. This blog is a pretty much imaginary place for me to showcase my attempts to represent in reality some of the things that have come to live in my imagination.
Showing posts with label model photos. Show all posts
Sunday, October 31, 2021
Happy Halloween!
Saturday, April 24, 2021
Bandai Star Blazers Mecha Collection EDF Destroyers
Here are some pictures of two complete Bandai Mecha Collection No. 12 EDF Destroyer from Space Battleship Yamato aka Star Blazers. Each kit comes with a pair of ships. One set I decided to accurize a bit. The nose is wrong, the aft engine cone comes to too sharp a point, and whatever that senson thing is on top of the bridge should be streamlined to come to a point at the aft end. I also sharpened up some of the details, like those wing-like things that support some sort of streamlined things on the end. I whittled them down so they have sharp leading and trailing edges.I decided to make the other pair have wave motion guns. For some reason, all the EDF ships except destroyers have this, so I figured the wave motion gun would eventually end up on destroyers, too. I used Evergreen tube that I cut to shape and sanded down, and puttied the inside to have a smooth concavity.I printed decals to try to upgrade the look of the ships to the standard of SBY 2202, which is pretty faithful to the look of the otiginal series but with far better production values. I don't think there were ever any hull markings in the original series, but these were added in SBY 2199 and continuing with 2202. I don't think there is anything about the look of these new series that isn't an improvement over the old.
I really like the trick of lighting starships with fluorescent paint illuminated by UV light. I recall doing this on my MPC X-Wing fighter back in 1978, and lighting up the afterburners of my model jet fighters that way, too.
I didn't want to bother with printing white on my ALPS printer (frankly, it's been so long since I used it, I would need a refresher). Instead, I drew all the artwork in AutoCAD 2013 and made sure white areas would be color #FFFFFF so nothing would print there.
For the modified destroyers with the wave motion gun, I modified the plaque by shaving off the kanji that say "destroyer." This I replaced with a decal with Japanese writing that's clear with a blue background, applied over white paint. These ships are named Ikazuchi and Inazuma, poetic terms for "Lightning" and "Thunder." Two Fubuki-class destroyers built in the 1930s had these names.I really like the trick of lighting starships with fluorescent paint illuminated by UV light. I recall doing this on my MPC X-Wing fighter back in 1978, and lighting up the afterburners of my model jet fighters that way, too.
Saturday, February 22, 2020
Braille scale Schwimmwagen
Raiding other model kits for figures - and in this case, just an arm - I broke into Hasegawa's 1/72 Schwimmwagen/Kettenkrad set. I was cobbling together a pilot figure for Eduard's 1/72 MiG-15 bis (more about that in a future post). Anyhow, opening a kit to steal parts from it leaves you open to the impulse to just build the damn thing, especially if it's a quick easy build. Maybe you're different, but without impulsivity I don't think I'd ever build models. We'll see if I get the impulse to build the Kettenkrad, too.
Marking options include army, SS, and Luftwaffe, so I went with Luftwaffe, since it might come in handy in some future diorama. I left out the driver figure, since it's sort of a misshapen blob with an oversized head. As you can see, the decal on the driver's side of the tub just sort of disintegrated. To help cover up this defect, I abandoned the plan to leave the whole thing in solid Panzer Yellow (one of the Polly S paints I still have) and brushpainted some camo with Model Master enamels (Panzer Red-brown and Panzer Green). The canvas top started out Humbrol Deck Teak, but it seemed too close to Panzer Yellow, so I overpainted it with Humbrol Hemp. The top lacks a rear window, which would have been clear vinyl on the real thing, so I glued on a piece of envelope window with Micro Crystal Clear. It's like Elmer's only better, and I used it to glue on the license plates from the decal sheet. (Yes, that's what instructions tell you to do, too.) Tires are Vallejo German Grey lightened in areas with Medium Sea Grey - my go-to method of painting tires.
Quick work. So there you have it. Not the best Schwimmwagen model out there (why do the blackout covers on the headlights have their slits at odd angles? And the propeller and prop guard are molded as one piece that's merely a suggestion of what should be there). The whole thing is barely two inches long, but it looks enough like a Schwimmwagen that I'm happy with it.
Marking options include army, SS, and Luftwaffe, so I went with Luftwaffe, since it might come in handy in some future diorama. I left out the driver figure, since it's sort of a misshapen blob with an oversized head. As you can see, the decal on the driver's side of the tub just sort of disintegrated. To help cover up this defect, I abandoned the plan to leave the whole thing in solid Panzer Yellow (one of the Polly S paints I still have) and brushpainted some camo with Model Master enamels (Panzer Red-brown and Panzer Green). The canvas top started out Humbrol Deck Teak, but it seemed too close to Panzer Yellow, so I overpainted it with Humbrol Hemp. The top lacks a rear window, which would have been clear vinyl on the real thing, so I glued on a piece of envelope window with Micro Crystal Clear. It's like Elmer's only better, and I used it to glue on the license plates from the decal sheet. (Yes, that's what instructions tell you to do, too.) Tires are Vallejo German Grey lightened in areas with Medium Sea Grey - my go-to method of painting tires.Quick work. So there you have it. Not the best Schwimmwagen model out there (why do the blackout covers on the headlights have their slits at odd angles? And the propeller and prop guard are molded as one piece that's merely a suggestion of what should be there). The whole thing is barely two inches long, but it looks enough like a Schwimmwagen that I'm happy with it.
Labels:
1/72,
Hasegawa,
Luftwaffe,
model photos,
softskins
Sunday, July 8, 2012
One Day Build: Star Blazers Mini No. 8--Finished in Eight Days
This isn't how Scotty would recommend getting a reputation as a miracle worker. Originally to be done in 24 hours (see previous post), this kit is finally done a week past the deadline. It's probably nicer than it would have been. I worked on it almost every day for an hour or two, and had time to think about what I wanted to do. Once the deadline was blown, I decided to replace the flight deck sticker with a homemade decal. As it turns out, this didn't take long at all. I scanned the sticker and imported the raster image into AutoCAD and traced a vector image over it, which I printed out on my Alps printer on decal paper. Here's a picture of the decal (right) next to the sticker.
I wrecked the decal putting it on and printed another, no problem. I didn't use any setting solution, just painted the flight deck with Future before decaling and PollyScale clear flat afterwards. The decal also needed a tiny bit of touchup with black paint before the dull coat. Here's the result, on the left. The Comet Empire twin-deck carrier at right is one I built in the '90s, shown for comparison.
Labels:
Alps printer,
anime,
AutoCAD,
Bandai,
model photos,
Star Blazers,
WIP
Saturday, March 17, 2012
DML Modern Sea Power Series
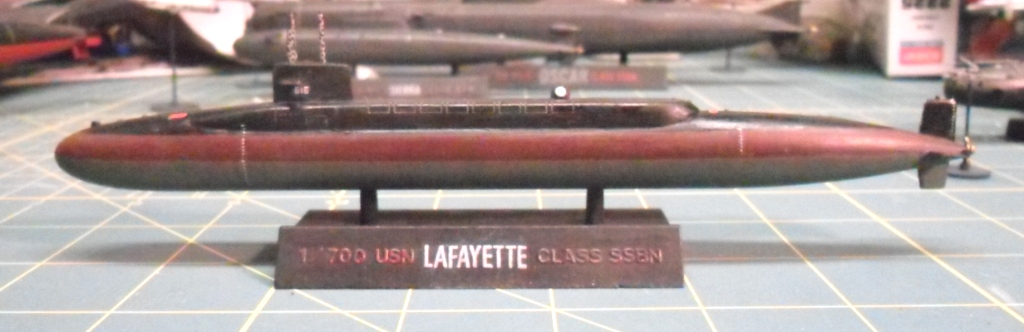
I've been needing to make space on my workbench, and not wanting to follow yet again the time honored tradition of modelers everywhere--taking half-built models off the workbench and putting them in a box on the shelf--I redoubled my efforts to finish some. I'm nearly finished with DML kit 7006 USS Benjamin Franklin vs Soviet Sierra Class.
It's comparable to DML's other five 1/700 scale kits of this sort that comprise a pair of subs, one Soviet and one allied, along with a couple ASW or anti-ship aircraft. I started building the series over twenty years ago. There are pictures at my other blog here. Here you get a Lafayette-class sub, according to the nameplate on the base, but decals for Benjamin Franklin. Benjamin Franklin-class subs started out with the same external appearance as Lafayette. I chose to follow the nameplate, but wanted the boat's number on the sail (although this is removed while on patrol). Therefore, I printed out decals on my Alps printer with the numeral 616, which I drew in AutoCAD so I could control the size and shape accurately.
Labels:
1/700,
Alps printer,
AutoCAD,
Cold War,
DML,
model photos,
ship,
Soviet,
US Navy
Saturday, January 28, 2012
Accurizing Revell AG's 1/72 Horten 229, Part 2
I've included some excellent drawings by A L Bentley from Merrick's German Aircraft Interiors so you can see my main reference. I just checked ABE books and saw it at $38 in acceptable condition. It's worth every penny!
Here's a rundown of the modifications I've made so far to the kit.The nose. The first inaccuracy I noticed upon opening the box was the shape of the nose. The kit part has a somewhat angular nose shaped very like that of the Hs 129. In profile, it should look like a fairly blunt-nosed thick cambered airfoil, e.g. NACA 2418. I made a drawing of the correct curve from references and printed it out in 1/72 scale, then cut a piece of sheet styrene to this shape. Next I cut the kit part in half and sandwiched the piece in between. The rest was puttying and sanding to produce a master. The images below show resin copies made from a two-piece RTV mold of the master, with a couple of kit parts installed. The obvious additions are the fronts of the jet engines, but I also cut off part of the landing gear door (discussed in Part 1) and made it a fixed part of the nose. This correction I made after molding the replacement nose, having noticed that the opening for the nose gear bay should be somewhat farther back. There are a bunch of these resin parts out there somewhere (hopefully in completed builds) as I was selling copies for a buck plus shipping back in '98.
Friday, January 27, 2012
Accurizing Revell AG's 1/72 Horten 229, Part 1
![]() |
| A layout of the Revell AG 1/72 Go 229 on my workbench, showing bits that have been assembled, modified, or replaced. |
Labels:
1/72,
Luftwaffe,
model photos,
NASM,
reference photos,
Revell AG
Monday, November 7, 2011
Star Blazers
Here are some photos of my Star Blazers mini ships. Bandai released these box-scale kits in 1979, and they were widely available in the US in the ‘eighties. (Read more about them here: http://www.starblazers.com/html.php?page_id=167.)
The spaceship designs, especially the capital ships, are ‘way cool, and Bandai did a really nice job molding them. My only criticism is the peel-off stickers they had instead of decals. I threw them away and painted on whatever markings they were supposed to have, trying to be reasonably faithful to the original, while using light weathering techniques to give the surfaces some visual interest.

The spaceship designs, especially the capital ships, are ‘way cool, and Bandai did a really nice job molding them. My only criticism is the peel-off stickers they had instead of decals. I threw them away and painted on whatever markings they were supposed to have, trying to be reasonably faithful to the original, while using light weathering techniques to give the surfaces some visual interest.

Labels:
anime,
Bandai,
mecha,
model photos,
Star Blazers
Sunday, November 6, 2011
AMT KBoP
Here's some photos of the AMT Klingon Bird of Prey that I built sometime in the mid '90s. It's straight out of the box except for opened windows and lighting modifications. Current is supplied for three circuits from the homemade base via the brass tube. One circuit is for a Christmas tree bulb in the forward hull (with an access hatch for bulb replacement) and tiny miniature navigation lights and headlights in the leading edge of the wing roots. A second circuit with a push button is for a red LED photon torpedo launcher. The third is for an automotive bulb for engine glow. This once had a circuit board I designed and built to supply a slowly oscillating voltage to the engine light to make it pulsate. None of these are in operation in the following photos--this gives me something to do in the future.
Naturally if I were lighting this kit nowadays, I'd probably use only LEDs. Painting is pretty much by memory, supplemented by imagination, from having watched ST:III and IV; the decals left something to be desired and I left them off.
Mecha
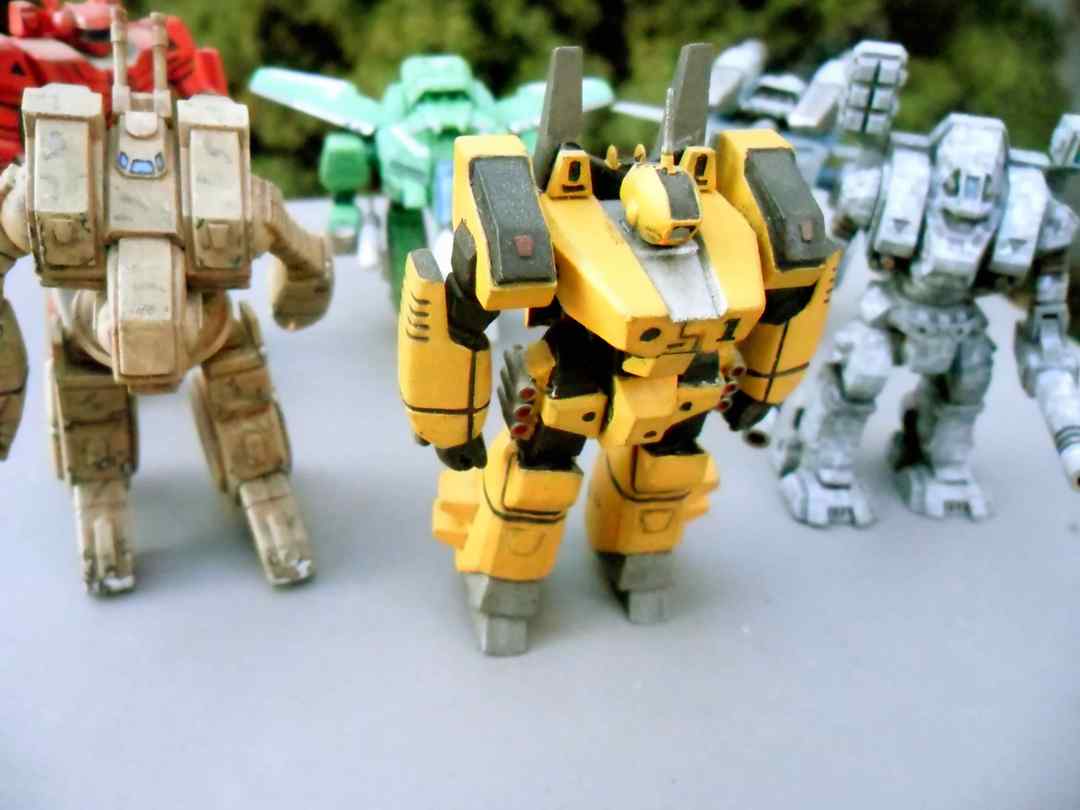
Some Robotech mecha, 1/144 scale, straight out of the box builds from the early ‘nineties. I'm no expert and my memory isn't reliable, but I believe these are all Bandai molds that were repackaged by Testors. Revell also repackeged them: I have one unbuilt Revell 2-in-1 kit. I recall they're held together with a screw, which I puttied over.
I wasn't interested in reproducing the mecha in the Macross sage. Frankly, since Star Blazers back in the '70s, I haven't followed any anime series too closely. I did however enjoy playing Battletech in the 'eighties, and painted these accordingly.
I did one in desert camo, one in urban camo, another in something like USAF air superiority gray, and the rest are in nice bright flying circus colors. Used some Metallizer and fluorescent colors in addition to the usual acrylics and/or enamels.
(I originally posted this stuff at my other blog, but those image files were a bit large. I resampled them so they're a quarter the linear size and about 15% the file size. The images are just as good. As I mentioned in the previous post, it seems the Samsung PL20 produces images with so much noise that the 14 Mp resolution only have about 1Mp of picture information.)
I wasn't interested in reproducing the mecha in the Macross sage. Frankly, since Star Blazers back in the '70s, I haven't followed any anime series too closely. I did however enjoy playing Battletech in the 'eighties, and painted these accordingly.
I did one in desert camo, one in urban camo, another in something like USAF air superiority gray, and the rest are in nice bright flying circus colors. Used some Metallizer and fluorescent colors in addition to the usual acrylics and/or enamels.
(I originally posted this stuff at my other blog, but those image files were a bit large. I resampled them so they're a quarter the linear size and about 15% the file size. The images are just as good. As I mentioned in the previous post, it seems the Samsung PL20 produces images with so much noise that the 14 Mp resolution only have about 1Mp of picture information.)
Saturday, November 5, 2011
Starting with Ultraman
I've been wanting to open a second blog, the first being Bellerophon's Scale Modeling Blog.
So here it is. There are features on Blogger I really like that aren't supported by blog.com (namely any widget that uses scripts). What'll I do with two blogs? Either put my main posts here, with the overflow on the other (like extra pictures), or divide up posts according to content. Or else keep one and let the other wither.
So here's some pictures of my Bandai Ultraman model, done up with aluminum and engine red enamels. I've also got an unbuilt Baltan Seijin (the lobster monster), which will have to accompany Ultraman at some unspecified future date.
I took the above photo back in June with a new Samsung PL20. I don't think I had discovered the macro feature yet, or the features governing autofocus, so he's not looking as sharp as he might.
Below are two photos I took yesterday, having gotten a bit more experience with this camera. In addition to finding out how to use the shooting features, I also discovered some of the compromises Samsung made in designing a $100 camera. These don't make much difference for sort of pictures people mostly take, but they do show up in model photographs. One problem: you can't control compression, so the image looks colorized, but by someone who couldn't color inside the lines. The CCD has some misbehaving pixels, too, which show up as random spots of color, usually faint and spread out due to compression. But the first function of a model photograph is documentary, and it is possible to take a reasonably good documentary photo a model with this camera.
I also resampled and compressed the photos with Corel Photo-Paint 12. The resampling cut the number of pixels to one-sixteenth, and I don't see that any real image data was lost. The camera boasts 14 megapixels, but it seems 13 million of them are just recording the same thing as their neighbors, plus noise.
So here it is. There are features on Blogger I really like that aren't supported by blog.com (namely any widget that uses scripts). What'll I do with two blogs? Either put my main posts here, with the overflow on the other (like extra pictures), or divide up posts according to content. Or else keep one and let the other wither.
So here's some pictures of my Bandai Ultraman model, done up with aluminum and engine red enamels. I've also got an unbuilt Baltan Seijin (the lobster monster), which will have to accompany Ultraman at some unspecified future date.
![]() | |||||
| Ultraman, right profile. |
I took the above photo back in June with a new Samsung PL20. I don't think I had discovered the macro feature yet, or the features governing autofocus, so he's not looking as sharp as he might.
Below are two photos I took yesterday, having gotten a bit more experience with this camera. In addition to finding out how to use the shooting features, I also discovered some of the compromises Samsung made in designing a $100 camera. These don't make much difference for sort of pictures people mostly take, but they do show up in model photographs. One problem: you can't control compression, so the image looks colorized, but by someone who couldn't color inside the lines. The CCD has some misbehaving pixels, too, which show up as random spots of color, usually faint and spread out due to compression. But the first function of a model photograph is documentary, and it is possible to take a reasonably good documentary photo a model with this camera.
I also resampled and compressed the photos with Corel Photo-Paint 12. The resampling cut the number of pixels to one-sixteenth, and I don't see that any real image data was lost. The camera boasts 14 megapixels, but it seems 13 million of them are just recording the same thing as their neighbors, plus noise.
![]() |
| Ultraman, front |
![]() |
| Ultraman, left three-quarters view. |
Subscribe to:
Posts (Atom)