Wednesday, December 25, 2013

RSO, Part 1

Oh, by the way, Merry Christmas! It's a long time since I posted, having gotten derailed from modeling this summer and making very little progress on aztec decals for Starcraft's 1:1400 scale Saber-class starship. Meanwhile, I've started on an armor (well, softskin) project that should get me back on track (no pun intended) but not take terribly long to complete.

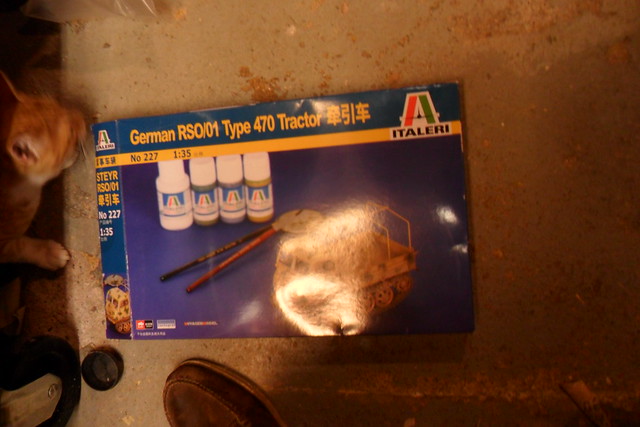
I recently got the Chinese version of Italeri's 1/35 RSO. It includes a sheet of photoetched details by Voyager and decals by Cartograph, neither of which I would expect to find in the Italian boxing. Sorry about the glare, but you know what the model looks like. The cat's name is Rory (as in Mr. Amy Pond). This kit was very inexpensive, Lucky Model's deal of the month or whatnot. A little history of this kit: Italeri (then Italaerei) bought the molds for this kit from Peerless/Max when they went out of business in the 1970s. Peerless Max is probably best known for their kits of various U.S. Army subjects in the range between the Jeep and the deuce-and-a-half (Italaerei bought a bunch of these molds, too). I never knew about their RSO since I don't remember seeing Peerless/Max kits at the 5 and dime where I bought models back then. But the Peerless/Max kits, while primitive by today's standards, are still pretty impressively detailed and engineered kits, and AFAIK pretty accurate.

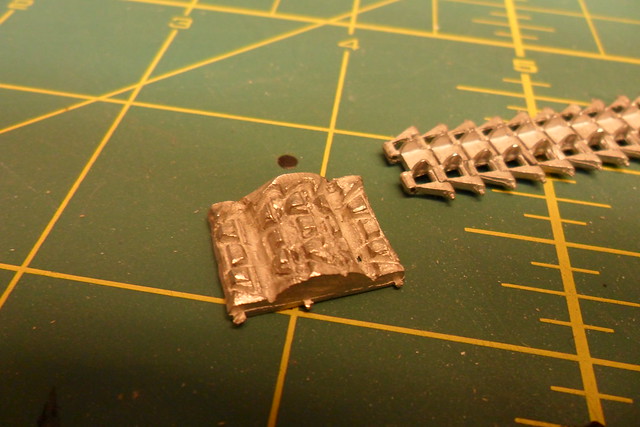
A major reason I bought this kit was that I already had the Fruil tracks for it. Someone had tossed them into the table of parts for the Iron Modeler competition at Wonderfest. The stuff was free to all takers once the competition was concluded. Since I build armor also, I snatched these up.


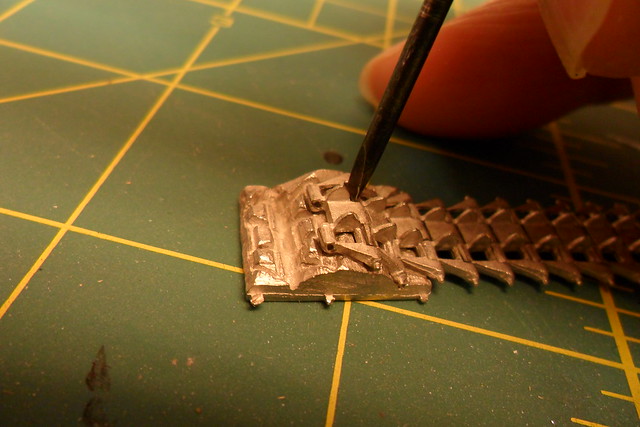
At right you see the assembly fixture, followed by a picture in which I demonstrate how to use the fixture. These tracks are not what I expected: there is no wire to form track pins. Instead, the track pins are cast as part of each link. The part of each link that is like a hinge barrel is open so it can trap the pin in the next link. You place the assembly on the fixture and press the open barrel shut (here I'm doing it with a jeweler's screwdriver), and you get workable track.

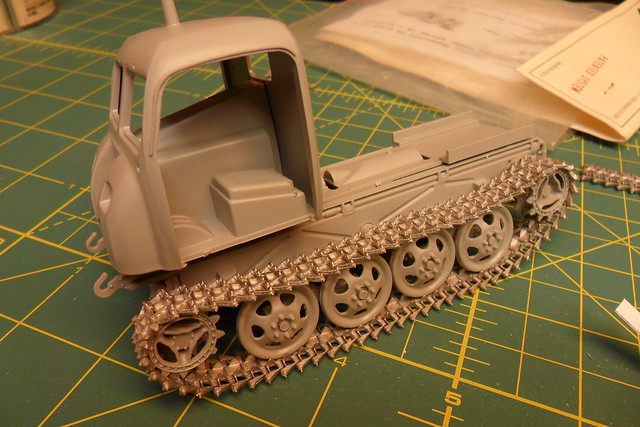
Here's one run of track test fitted on the tractor. They look pretty good here, but I had to cut out a couple links in which the pins broke, probably because I closed the links together with too much force. PMMS has a review of Fruil's track set for the RSO, but it's for a new version, which confusingly has the same number of ATL-29. The differences are that the new links are more accurate, that they have wire for link pins and bolt head parts to make right- and left-hand tracks, and that sprockets are included. The new set apparently takes 69 links per run. I don't have the Panzer Tracts for the RSO, so I don't know how many links it should take. I looked at the best photo I could find of a real RSO and tried to count the number of links, and it seemed to be 72. The run I assembled took 67 links.

Since there are two versions of Fruil's track set ATL-29, you may get the old set when you think you're ordering the new set. However, I'm pretty happy with the old set. They are a bit wider to fit the wider kit sprockets, but the difference in width is kind of hard to see. Once I got the hang of assembling them, it was a breeze. True, the bolt heads on the link pins aren't there, but to my eye these are too large on the new track set. All in all, I don't see a lot of reason to prefer the new set over the old.

Friday, July 5, 2013

1/1400 Saber-class NCC-81623 USS Da VInci, Part 2

I gave the model its first coat of primer. A relatively hard thing to fix is the loss of saucer edge detail near this RCS quad. I filled the gap with gel superglue and hit it with accelerant, then sanded and added more. I also puttied. After it's primered again, we'll see how much more work it needs so that the repair is unnoticeable.
Some areas don't need much help. Here you see only two little spots of putty on the saucer underside.
The edge of the engineering hull behind the saucer edge has a more serious defect, what appears to be a two-part mold problem. The area just needs the usual  filling, sanding, primering ad infinitum.
The largest bubbles and some more two-part molding defects were on the warp nacelles. Nothing too bad.
Pretty much the same thing as the other pic of the engineering hull, eh?


Next time: all primered up and smooth and ready for painting. But it's going to have to wait two weeks till after vacation.

Thursday, July 4, 2013

1/1400 Saber-class NCC-81623 USS Da Vinci

Here's the beginning of a new project I hope will be brief. I acquired a Starcraft 1/1400 scale Saber. It's one of the new starship classes seen in Star Trek: First Contact. In the Starfleet Corps of Engineers books, most of the action takes place on one of these ships, USS Da Vinci NCC-81623, which this model will represent.

EDIT (28Feb2014): I've heard from another modeler who used Klean Strip on resin and it ate into the resin. Like the advice given on a lot of products, test on an inconspicuous area to make sure it's safe. This product also works really fast, so you should not have to leave it on long.

Since the kit was previously finished, the old paint had to go. The paint stripper really looks like vomit, but has a very different nasty smell.


Incidentally, it was possible to use this stripper only because this model is resin. Out of scientific curiosity, I put some onto painted styrene. Here's the result:
It strips the paint, then turns the plastic into taffy. Back to the Saber...

Here's how it came out after soaking in stripper and scrubbing with a toothbrush dipped in lacquer thinner. Cleans up real nice. It was also possible to pop the nacelles off. I let the joint soak in acetone, then used a pair of slip-joint pliers and a piece of inner tube to pry off the nacelles without marring the surface.


It was bugging me that there are some symmetry problems with this kit. This is an older Starcraft kit and not quite state of the art any more. It was assembled just fine; in fact, there were locating pins for the nacelles. In this picture you can see where I had to sand down a panel that stuck out too far. Easy fix.
The starboard nacelle's pylon overlaps some lifeboats, and the port nacelle's front face is too far forward. Mostly this is an easy fix also, requiring just a bit of sanding. The mating surface to the pylon on the underside of the saucer, however, is a bit proud of the surface and needs to be carefully sanded to avoid wiping out the lifeboat detail. In fact, I had to re-establish some of this detail by scraping with an x-acto blade and using a scribing tool.
Here it is fixed. You can also see a dark stain on the underside of the saucer. Looking at it closely, I realized it's composed of paint that filled in thousands of tiny bubbles, and it won't be visible once it's primered. Another symmetry problem that needs to be addressed is the dogtooth detail on the leading edge of the saucer. A little bit of sanding will rectify this.


Next time: Primering and filling and sanding, oh my!


Tuesday, July 2, 2013

baQa'! pay' QapHa'taH beghwIj 'ach vItI'laHbe'!

Translation: Damn! Suddenly my deflector is malfunctioning but I can't fix it!
One of the LEDs burned out, so the deflector ring is wov on one side but wovHa' on the other. There's no way I can get in there to fix it. At least the poS side isn't completely Hurgh. Do'Ha'!

EDIT: There was a grammatical error in the title. The subject noun beghwIj ("my deflector") should not have preceded the predicate verb QapHa' ("malfunctions"), so I fixed it. I also made the verb QapHa' into QapHa'taH ("is malfunctioning"), since the malfunction is ongoing. Also there is an error in the lower callout in the photo. I copied and pasted from Bing to MSPaint. Apparently due to different coding between Bing and the pIqaD font I have loaded, the pIqaD came out different. Fortunately, most of us (myself included) can't read it. Of course, now that this happened, I'll have to learn how to read Klingon in pIqaD.

Sunday, June 2, 2013

Yamato 2199 Size Chart

Here's a size chart I found somewhere of most of the ships seen early on in Space Battleship Yamato 2199. I just added the transliterated names of ships. There's more info in a previous post and at the official website (here's the mecha page). Unfortunately, if you can't read Japanese you'll have just as much trouble as I do understanding the official webpage. The American fan site is Cosmo DNA. This replaced StarBlazers.com, which you may remember and which is now accessible through the Wayback Machine. Go check that out to find stuff that still isn't at Cosmo DNA. Just remember to set the Wayback Machine to the year 2012 or earlier!

Monday, May 20, 2013

KBoP Part 21: Completed! And at Wonderfest 2013

There are more pictures of this model at Modelers Miniatures and Magic.

Here's a bit of video I shot at Wonderfest of the finished KBoP to show the lighting effects. Doesn't quite show all the lighting but I'll post more later. I was shocked when it won Gold in the Vehicles category and Best Round 2 Model Kit Adult Division. I knew darned well what things were wrong with this build--maybe they're minor but there are plenty of defects. I guess the fact that it's a Klingon ship let me get away with things that would be unacceptable on a Federation ship.

Halleluia! Blogger and YouTube are talking to each other again, so I can embed my video. It's always the kids who get hurt when the parents can't get along. Here's another short video showing all of the lighting effects. In Deutschland ist dieses Video möglich gesperrt wegen des Urheberrechts der Musik. Sie ist Beethovens Symphonie Nr. 7, zweiter Satz. (I really like Beethoven's Symphony No. 7, especially the second movement, and it sounds a lot better than what the video camera recorded: my breathing and air conditioner noise.)

Here's a longer video that shows all the lighting effects along with my boring narration where I explain the things I did with this model.


As I said, I'll take more pictures and video and add them to this blog post in the next few days. I actually finished this model on Saturday morning in my room at the Crowne Plaza upstairs from Wonderfest, and what photos I took were of other people's stuff.

Wednesday, May 15, 2013

KBoP Part 20

Quick update as I am frantically trying to get this done before leaving tomorrow to go to Wonderfest.
Here's the wings on. No disruptor cannons yet so it can't go "Pew, pew, pew!"


I have painted lots of KBoPs already. I don't need another one with red wings on the underside. Besides, that's a Romulan thing. Klingons' favorite color is green. Okay, red if it's spilling out of humans, but I mean ship colors.


The blank side of the landing gear doors will show, and Round 2 put nothing on them except ejector pin marks. So I hollowed them out a bit and added styrene detail before painting and weathering.

Tuesday, May 7, 2013

KBoP Part 19

I put the wings on. I notice a slight asymmetry in the fit, but at this point I'm not going to do anything about it. A side effect of installing lighting is it makes construction a real pain and correcting fit issues becomes more trouble than normal.
There are some kind of vent-looking things on either side of the top of the engine deck. The recessed detail looked a little plain, so I dressed it up with photoetched parts on both sides. (From the spares box--it's 1/700 ship ladders.)
Finally, all of the lighting is soldered together. Here I have one 9V battery powering all of the lighting at once, and hooray! everything still works. I have yet to route some of the fiber optic, then carefully close up the hull halves. Then all that's left to do on this bird is finish up the outside.

Tuesday, April 30, 2013

UN Combined Fleet in Space Battleship Yamato 2199, and the Bandai kits

Disclaimer: My knowledge of the Japanese language is pretty meager, but I keep learning.

I was surprised to find that in Episode 11 of Space Battleship Yamato 2199, a flashback to Daisuke's childhood shows his dad as captain of Murasame, which is subsequently destroyed in the first contact with the Gamilas. I thought Murasame was destroyed by the Gamilas in Episode 1, in the battle off Pluto.

I was mistaken. CAS-707 Murasame (written as むらさめ on the hull) evidently isn't shown or mentioned in Episode 1 as I was led to believe by its inclusion in Bandai's Combined Fleet kit and the fact that the first cruiser lost in the battle off Pluto has the same color scheme. (It doesn't make sense to me that any two ships should share a color scheme. The only reason I can think of for the colorful markings is visual identification at great distance.) BTW, Murasame was the name of several real destroyers.
CAS-253 Yūgiri right before destruction.

The first ship lost in the battle off Pluto is CAS-253 Yūgiri, which shares her name with a real cruiser. I may be misreading it, but the hiragana on the hull appear to say "Yuragiri" (ゆらぎり). I found a picture of Yūgiri's namesake from 1930-1943, and the side of its hull bears the katakana inscription (read fore-to-aft) ユフギリ "Yufugiri." I fail to understand why the inscription would not be ゆうぎり or ギリ ("Yu-u-gi-ri" or "Yū-gi-ri").


Episode 1 mentions cruiser Abukuma and destroyers Shimakaze and Isokaze (the latter lead ship of her class), all of which share names with real warships. Then Amaterasu and Uzume are mentioned. Even though the Combined Fleet's mission is a diversion to keep the Gamilas from noticing the recovery of the ship from Iscandar, it wasn't at all clear to me from the subtitles that Amaterasu and Uzume are the respective code words for the Iscandarian ship and the Mars recovery team. Thanks to Ithekro for clearing that up.

With of course Kirishima and Yukikaze, those are all the ships mentioned in Episode 1. (BTW, Yukikaze was a WWII destroyer that is still renowned for leading a charmed life and surviving the war.) Maybe you can make more out if you freeze-frame the Bluray disc. 

There are quite a few choices for ships represented on the decal sheet in Bandai's Combined Cosmo Fleet Set #1. In addition to BBS-555 Kirishima, CAS-707 Murasame, and DDS-117 Yukikaze, it also includes markings for the cruisers CAS-253 Yūgiri, CAS-266 Atago, and CAS-229 Abukuma, battleships BBS-551 Kongō and BBS-552 Haruna, and destroyers DDS-172 Shimakaze, DDS-103 Ayanami, and DDS-106 Shikinami. All of these have namesakes in the real world IJN (JMSDF as well in some cases).

Bandai's Combined Cosmo Fleet Set #2 came out earlier this year and besides what's expected, includes a Mini Mecha Collection Cosmo Zero and some decals that were missing from the SBY2199 1/1000 Yamato release. The expected items are two Murasame class cruisers and two Isokaze class destroyers. Markings are supplied for the following cruisers: CAS-702 Nachi, CAS-718 Murakumo, CAS-741 Ibuki, CAS-777 Tsurugi, CAS-854 Kurama, and CAS-890 Yakumo. Here are the destroyers: DDS-101 Isokaze, DDS-119 Ayase, DDS-144 Shiranui (uncertain--the decals are very small and appear to say either "Shiranui" or "Shiranei." Shiranui are a rare atmospheric light phenomenon, hence an appropriate destroyer name. "Shiranei" means nothing, but a real JMSDF destroyer has the similar name Shirane), DDS-147 Fuyusuki, DDS-148 MinazukiDDS-149 HatsushimaDDS-164 Kagerō and DDS-216 Tachikaze.

A complete list of ships at the battle off Pluto follows, according to this source. Note that not all the ships on the decal sheets above are listed here. Kirishima was the only battleship, so her sisters Kongō and Haruna were presumably lost before the battle, perhaps at first contact. (I need to rewatch Episode 11.) Murasame was also lost at first contact. Amaterasu and Uzume are also omitted. And it is curious that the decal sheet for Set #2 includes a DDS-144 apparently named Shiranui but the list includes a DDS-114 Shiranui. Which is right? One asterisk follows ships on the decal sheet for Set #1 and two for Set #2.


1 Kongō type battleship
Kirishima (BBS-555) *

8 Murasame type cruisers
Atago (CAS-226) *
Abukuma (CAS-229) *
Yugiri (CAS-253) *
Nachi (CAS-702) **
Murakumo (CAS-718) **
Ibuki (CAS-741) **
Tsurugi (CAS-777) **
Yakumo (CAS-890) **

12 Isokaze type destroyers
Isokaze (DDS-101) **
Ayanami (DDS-103) *
Shikinami (DDS-106) *
Shiranui (DDS-114) ? (or DDS-144**)
Yukikaze (DDS-117) *
Ayase (DDS-119) **
Fuyusuki (DDS-147) **
Minazuki (DDS-148) **
Hatsushima (DDS-149) **
Kagerō (DDS-164) **
Shimakaze (DDS-172) *
Tachikaze (DDS-216) **

Sunday, April 28, 2013

KBoP Part 18

Last Sunday was Model Day with Jim Pugliese and Eric Longstreet of the Collective at Jim's house. Got a little done on it up to that point and that day, though most of it since last post has been electrical work and not much to look at. I've got the command pod closed up now, and no light leaks so far. The wires to supply electricity to the model come in through the two objects on the starboard side. See the second pic--hard to see because that part is in shadow, but if you know the Klingon Bird of Prey, then you know what I'm talking about. They seem like a likely function is power couplings when on the ground.

Unfortunately, after last Sunday I realized how close Wonderfest is--it's the weekend of May 18-19! Yikes! Between freaking out over that sudden realization and the fact that I had a gazillion other things to do, I got absolutely nothing done on it till this evening. And what I got done was ungluing the lower part of the command pod, which wasn't fitting right, reattaching it, and puttying the seam. But the closing up of the hull has commenced.

Also stopped by Steve Neill's hangout. This evening was the first time the hangout was in operation, and I guess it's a work in progress for everyone to figure out how this technology works. I participated as best I could with no mic or webcam, which is to say little at all, though I shared one of these pics. We'll see more of how it works on coming Sundays.

Sunday, April 7, 2013

KBoP Part 17


Studio model of Klingon Bird of Prey
Another mini-update.

Like I said, there needed to be more detail in other more visible parts of the ship, and one area that needed help was the shallow opening full of wiring or plumbing on the top rear of the command pod. At right, you see what I'm talking about on the real thing. I didn't attempt to recreate the studio model, but by the end you'll see what I did do to improve the detail on this area of the kit.


The kit detail is skimpy here, so I decided to cut it out and back up the hole with an insert loaded with detail.Cutting out the hole was pretty easy. As easy as Cortez burning his ships. No turning back now!


The plastic is pretty thick for the scale so I hogged out the surrounding area to make it look like a thin shell. I slopped on black paint in order to...


...transfer the impression of the opening to this sheet styrene backing. Actually, it's two layers cemented together. I held it in place to make it conform to the shape of the inside of the hull, and when it came out it was permanently formed into about the right shape.


Here's the blank styrene backing held in the opening.


I added wire, solder, and styrene shapes to fill in the area of the backing that would fit in the opening, painted it red-brown with a grimy black wash and dark yellow drybrushing.


Then installed it with 1-minute epoxy.


And here's the prize in the box. It's jazzed up with a bit of fiber optic lighting.

Saturday, April 6, 2013

KBoP Part 16

Another mini-update. The airlock chamber that exits through the top hatch in the forward hull is now installed. And populated. Er, Klingonated. There are two Klingons in there. In the first picture, there's a Klingon climbing the ladder. In the second, you can see another Klingon standing just inside the inner hatch. These are Tamiya 1/350 sailors (well, figures; the only thing that makes them sailors is that they are made to go with 1/350 ship models). I painted them to look like Klingons, which didn''t take much as they are two tenths of an inch tall, or 5mm. The guy on the ladder needed to be bent up a bit to get him to be in about the right pose.

You might also notice the floor texture in the top photo, and the light green color of the floor beyond the inner hatch in the lower photo. The texture is fine mesh superglued to a disk of styrene, and I chose the light color simply because otherwise you couldn't see a darn thing in there. Now it needs the hatch on top, the rest of the lighting installed, and the upper and lower hull halves to be glued together--with wires sticking out to connect to an external power supply.

Wednesday, April 3, 2013

KBoP Part 15

Just a quick update. I had an hour before bed to do some stuff I thought about to the airlock chamber under the hatch. It made sense for the interior door to have the same sort of control panel as the one at the top of the boarding ramp. So I made another one with 0.25mm fiber optic threaded through a tiny styrene polygon with holes drilled with a #80 bit. The control panel will connect to the same red, yellow, and green blinking LEDs as the other one. I also drilled out holes for lighting fixtures near the top of the chamber and threaded fiber optic through those, which will connect to warm white LEDs in the forward hull. I put it all together with 1-minute epoxy, plus a bit of styrene tubing to keep the control panel from wobbling. Then a bit of paint. It is going to be a pain to put this all together with fiber optic connecting parts in the top and bottom hull halves, but I will manage somehow.

Tuesday, April 2, 2013

KBoP Part 14

Previously on Klingon Bird of Prey...

Did I say next time I'd finish the lighting and close her up? If I did, I lied again. Instead I've been ensuring that this project will go on longer than I hoped, by incorporating more detail that I had planned on.

I decided with all the detail packed into other areas of the ship, the forward hull needed some more attention. There's a hatch on top, which is used in ST:IV, and although the movie set is a poor match for the filming miniature (there is no way to reconcile the differences), there is a hatch on it too. At the size stated by Nilo Rodis, the hatch on the filming miniature is a lot bigger, but of course the set was built smaller. This is nothing unusual, since movie audiences aren't equipped to make precise size comparisons. Fans figure this stuff out later with screen grabs and CAD software and such.

The hatch is about a scale six feet in diameter on this model, pretty generous! The series of pictures at right shows how my approach to adding an open hatch and some interior detail evolved along the way. My first thought was to score around the inside of the raised ring to remove the hatch, in hopes of using it. I've tried this kind of thing before and it generally doesn't work, especially removing such a small part. At worst, it's good practice at precise cutting.


Here's the opened hatch, and as you can see, the raised ring was damaged by the cutting.

My first thought was to re-establish the raised ring, and build up a round airlock, using this vinyl hex tubing. Where'd I get it? It's the rod that you twist to operate miniblinds.

I wasn't too happy with how that was going so I made a replacement ring from brass tubing. To do this, I jury-rigged a lathe. I chucked the brass tubing in my drill press and ran it down into a hole of matching diameter I drilled in a wood block clamped to the table. I ran the tubing into the hole a distance equal to the width I wanted for the ring. This way the wood block provided a steady support so I could use the tip of a #10 blade as a parting tool. I turned on the drill press, a neat little curlicue of brass came off, and into the hole dropped this neat little brass ring. Well, not perfectly neat: I deburred it with a sharp #11 blade.

I also made a replacement for the hatch, shown here on my fingertip with the original. I used the same diameter brass tubing to punch out a disc of sheet styrene. The original hatch also has a small disk-shaped projection near the edge. I reproduced this with a thin slice of styrene rod, which I glued in place over a hole I drilled, which helped with locating the little disc properly and will provide an attachment point for the hatch. I recall Panther tanks had a hatch that went up a little on a vertical shaft near the edge and then rotated out of the way. This hatch will open that way.

I forgot to mention, there's another ring of brass tubing inside the aforementioned one. It gives more detail and provides a ledge to support the hatch when it's closed. At right is the hatch in the closed position. I just wanted to verify it would fit; it was pretty tight.


Here's how I ended up using the bit from the miniblind. I hollowed out a hatch using my drill press as a crude milling machine and scribed a slot around this opening for a sliding door which won't be needed as the door will be shown open. Then I cut the piece to length and shaped the top to the inside curve of the forward hull where it will go, filed out a slot for a photoetched ladder, which I folded and superglued in place, and primered the whole thing.

Next time: I'll finish up with the hatch and maybe one or two other detailing goodies on the forward hull, then get all the lighting installed and close this baby up. I hope.

Sunday, March 17, 2013

KBoP Part 13

Previously on Klingon Bird of Prey...

Here are some progress pics of the Klingon Bird of Prey. I did take a bit of a break from it--I never completely stopped but the work slowed down for a while. I'm nearly ready to close up the hull, stick on the wings, and do the finish work on it that you do after you already see the light at the end of the tunnel. Speaking of light, here's the red and amber lighting for the torpedo emitter (and navigational deflector?). Paint needs some touch-up.

 Here's the wiring for that lighting. I was originally going to add nine small red LEDs to light up the ring around the torpedo emitter, and had them all soldered up, but try as I might could not fit them in. So there are three ultra-bright red LEDs, plus the amber one in the middle. Plus limiting resistors so it can run on 9VDC. All packed in epoxy.

I used the technique promoted most famously by Don Matthys of Don's Light and Magic to glaze the windows in the lower front command hull, but used 5 minute epoxy, which is pretty viscous, so it didn't fill the windows completely. His method is to tape over the outside of the opening and pour in clear resin. Here I tried a variation on the technique: I cut out holes in the tape, painted in there (to repair damage to the paint job and to seal the tape better). Then I smeared in clear epoxy from the outside. It worked better but the result wasn't perfect.

I couldn't resist: The detail along the trailing edge of the wing sticks out on the kit, but on the filming model it's recessed. So I hogged out the detail and replaced it with strips of Evergreen corrugated siding. You can see the LEDs and fiber optic in there, too. The LEDs are those Christmas lights I mentioned before that consist of warm white SMTs on lacquered wire with a blob of clear resin on each one. I drilled out a hole in the resin for the 1mm fiber optic and inserted it with epoxy. Then sealed the light in for better transmission with repeated coats of Metallizer alumiinum plate and Future.


Here's the new trailing edge. Sorry about the focus. You get the idea.

Lastly, here's a lighting test. What are those things, headlights? Navigational deflectors? I don't know; maybe I'll have to get the owner's manual now that it's out.


Next time: maybe I'll get the last of the lighting installed and close it up.