Showing posts with label Italeri. Show all posts

Thursday, February 29, 2024

Italeri No. 6037, 1/72 scale Austrian & Russian General Staff

 My wife and I saw Ridley Scott's Napoleon just before it was pulled from the theaters. I had my doubts about it going in, having heard of obvious historical inaccuracies and Scott's attitude toward historians, which he stated as "Were you there, mate? No? Then STFU!" Perhaps Scott thinks he's valuing lived experience over book learning, or art over pedantry, but he's really valuing ignorance over knowledge. Even with his cavalier attitude, Scott would have been very short on material about Napoleon without the detective work of historians.
Anyway, seeing the movie made me want to know more about the Napoleonic Wars and to try my hand at painting Napoleonic figures, something new for me.

I started off by priming the whole set with Mr. Surfacer 500, then painting faces and hands with Vallejo flesh tones. The figures are molded in polypropylene, which takes paint rather poorly, so the primer coat was essential, and even that was easy to scratch off. Then I started painting uniforms on one of the two trees of figures, the Russians.

My knowledge of Napoleonic uniforms is close enough to zero to constitute complete ignorance, so I had to do some research. I found that except for the three general officers, the remainder are grenadiers, probably the Pavlovski grenadiers, who kept their miter hats after other Russian grenadier regiments had traded them in for shakos. I found images online, including color plates from the 19th century and beautifully painted figures in larger sizes, and at first what I saw was blue uniforms. This made sense to me, since the diagonal white straps crossing over blue-uniformed grenadiers' chests would form the Cross of St. Andrew, an official emblem of the Russian Empire. In fact, it's the ensign of the Russian navy both under the czars and since the fall of the Soviet Union.

But I also found green, and various shades between blue and green, and a description of the Napoleonic Russian uniform color as "bottle green." That description is very specific, and wouldn't be applied to any color you'd describe as blue. I think the source of the supposed blue color is similar to the notion that USAAF P-51s in the ETO were painted blue, namely fading of color images and faulty color reproduction. But I'd painted them all blue! What was I to do?

I decided that repainting three generals wasn't too much trouble, but that repainting 18 grenadiers was out of the question. Before this, my figure painting experience was modern figures, generally WWII troops in monochrome uniforms. I could practically paint an entire platoon in olive drab in the time it takes to paint one Pavlovski grenadier! (Yes, while painting these, I kept telling myself to just be patient. The more patient I was, the better I enjoyed painting them. But that didn't mean I wanted to start over!)

One modification I made, based on the review of this set at Plastic Soldier Review, was to shave the monogram of Czar Alexander from the saddle blankets and paint on a star of St. Andrew. All the painting was with various Vallejo colors, except for some shiny bits that I painted with my old stock of Model Master metallics. The turf on the bases is Woodland Scenics held down with some of their scenery cement, which I then thinned and let soak into the attached turf to help it hold together.

I have yet to paint the Austrians, so they'll be the subject of a future post. Meanwhile, these figures are for the time being on display at AAA Hobbies in Magnolia, NJ.


Tuesday, January 21, 2014

RSO Part 4

Just a short update. I finished cleanup of the new vent holes to make them neatly geometrical, so they look like they were made by Germans (or Austrians, rather) and not cavemen. Then a shot of primer, and I added metal screen. The problem is that the cab is about a scale inch thick, but softskin vehicles like the RSO are made of sheet metal. The screen in the real thing is fastened over the opening from the inside and has no problem lying flat and nearly flush with the back of the cab. I couldn't come up with any better alternative than pressing the screen in from the inside, and the results aren't as good as I'd like. To really get the right look, one would need photoetched parts for the openings. Some plastic would have to be shaved off, the PE parts put in flush with the surrounding surface, then puttied smooth so it's impossible to tell where the PE starts. The screen would be attached to the PE from the inside, and would be nearly flush with the outside since the PE is so thin.

Although these screens don't satisfy me in this case, it was good experience and would look right for some applications. I'm leaving them be since there will be a canvas top, which will make them very hard to see. The duct inside the cab has several similar screens that will be more visible, so I will have to consider how to make those.

Sunday, January 19, 2014

RSO Part 3

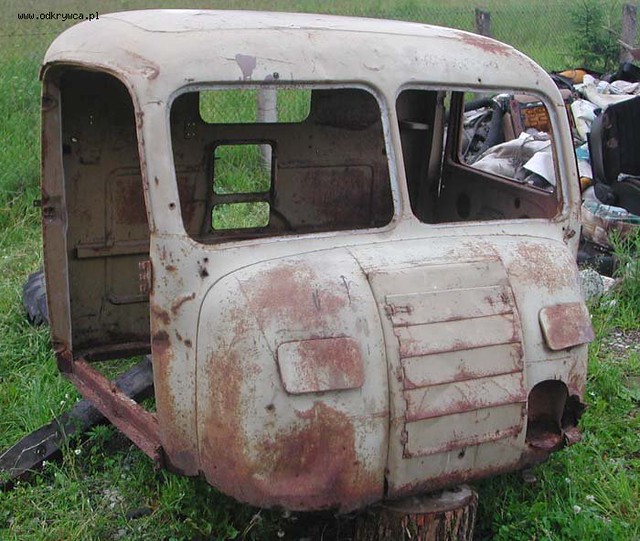
I noticed that while the vents on the rear of the model's cab are centered, the cooling air duct that fits in the cab is off-center. Aside from the fact the duct wouldn't line up with the vents, the vents are supposed to be off-center, as you can see in the picture. I forget where I found this picture, but apparently someone found this RSO cab somewhere in Poland.


In the next picture, you see the relocated openings superimposed over the old vents, which are just surface detail. The lower opening shouldn't be as tall as the upper, so I corrected that, too. I have since started puttying over the old vent detail and mesh will go in the openings to complete the vents.

Aside from this, I've been puttying and sanding ad infinitum, primering, and opening the vent holes in the front of the cab. I found out those two rectangular covers with rounded corners that you see in the top picture are dampers for vents. Expecting the RSO to have headlights other than just the Notek blackout light, I had thought they were headlight covers. I even found a wartime photo of an RSO with what appeared to be light shining out one of those openings, but vents they are, and for a good reason. It could get hot in the cab sitting next to the air-cooled V8 engine. Wartime photos often show just one of the vents open, usually the driver's vent.

Sunday, January 5, 2014

RSO Part 2


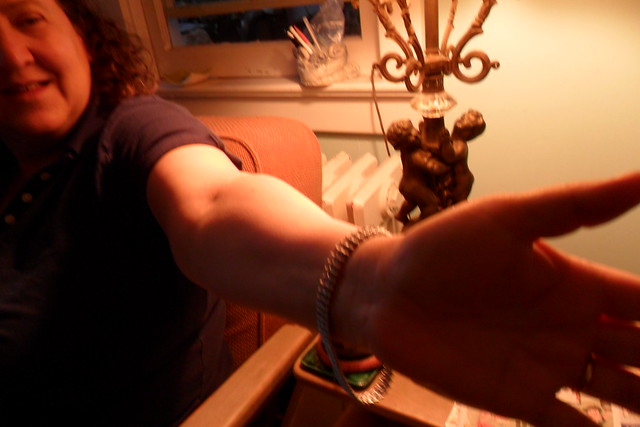
Friul should consider branching out. Check out the what a fine bracelet these RSO tracks make, modeled here by my lovely wife Ilene.


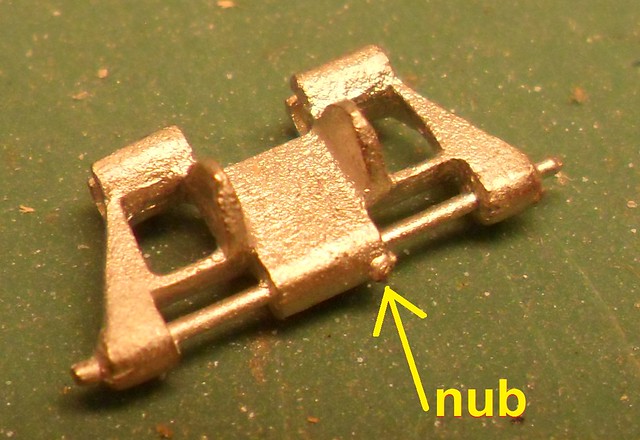
Closer inspection reveals why some of the pins broke after I assembled the first run of track. The nub you see in the photo at right is enough to wedge the adjoining link causing it to pull on the pin, shearing it off. Before assembling the second run I filed any nubs off.


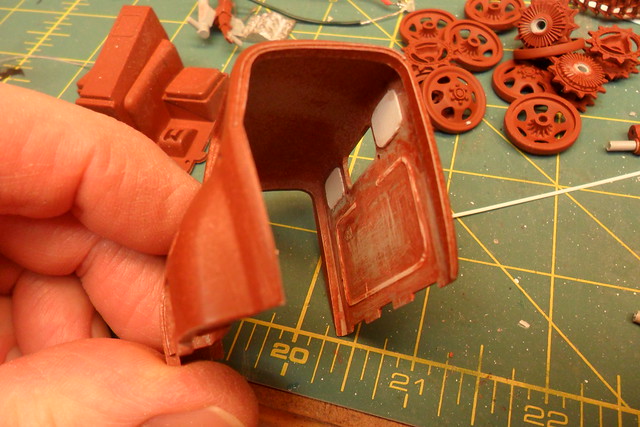
The shapes stamped into the back of the cab should also show on the inside, as in this close up from a walkaround at the Military Models website in New Zealand. I edited the picture to indicate the stamped shapes. This particular walkaround is great because the vehicle is painted white and partially disassembled, making details more visible.

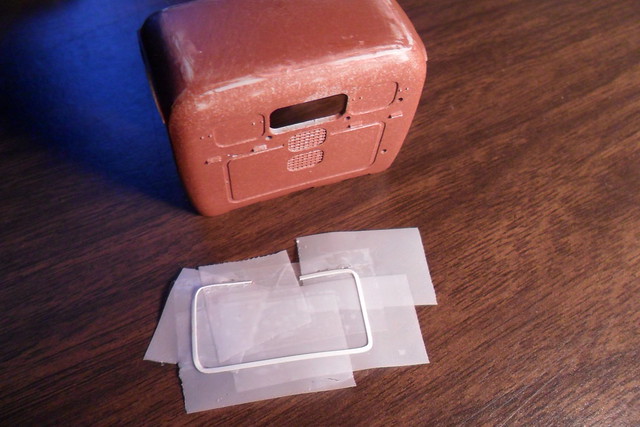
I made the matching raised areas in the back of the cab by fitting sheet styrene into the depressions. First I taped a piece of strip styrene into the depression running around the lower part. I bent the strip to get it to go around the corners.

Once I had the styrene shape formed, I simply peeled off the tape and the styrene with it.


Next I put it into the cab and cemented it in place, carefully peeling off the tape.


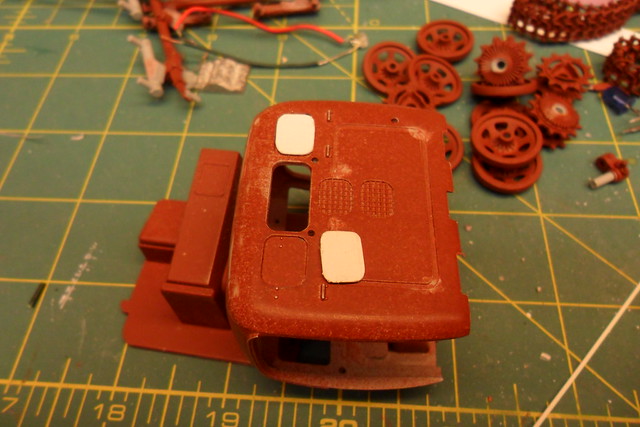
The rectangular depressions on either side of the rear window have sheet styrene cut to fit...


...which is then transferred to the inside to form the raised areas, then cemented in place.


I found in period pictures and modern day walkarounds that the main bolt holding each roadwheel on is often secured with a strap held on by two opposing lug nuts. The RSO probably came from the factory this way. I decided my RSO should have this feature.

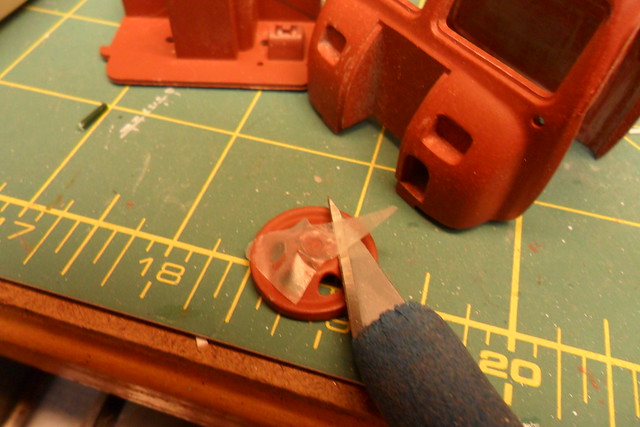
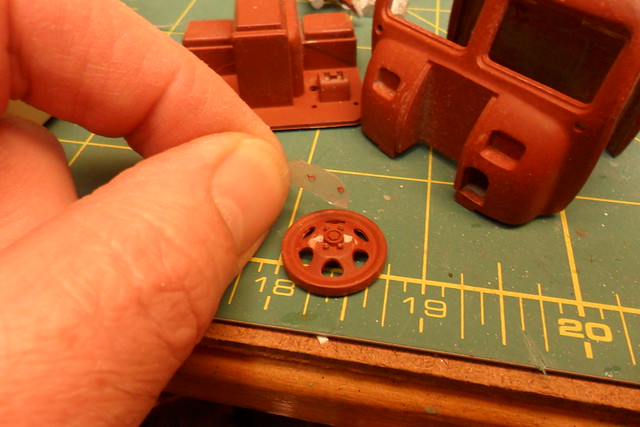
I wanted to simply put a strip of brass with two holes over the lug nuts, but this wasn't practical. My only other choice was to remove two lug nuts, superglue a strip of brass on, and reattach the lug nuts with superglue. To this end I sliced two lug nuts off each roadwheel with a fresh #11 blade (with tape over the nuts to keep them away from the carpet monster).

Then I pulled off the tape taking the two nuts with it. I shaved off the remaining plastic left behind so the brass strip would be tight against the wheel. Not shown is how I cut a strip of brass, pressed it over the hub of the wheel, and cut it to length. Some of the wheels got scored in the process, so a bit of putty was required to cover up the damage.

And here are all eight roadwheels modified with the brass strip and the lug nuts reattached. Comparing my work to photos of the RSO, I made the strips a little too wide, but I'm just glad the carpet monster didn't get any of the lug nuts. They are practically microscopic!

Wednesday, December 25, 2013

RSO, Part 1

Oh, by the way, Merry Christmas! It's a long time since I posted, having gotten derailed from modeling this summer and making very little progress on aztec decals for Starcraft's 1:1400 scale Saber-class starship. Meanwhile, I've started on an armor (well, softskin) project that should get me back on track (no pun intended) but not take terribly long to complete.

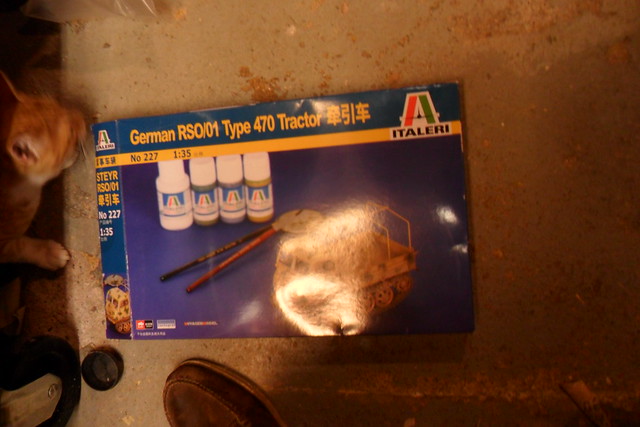
I recently got the Chinese version of Italeri's 1/35 RSO. It includes a sheet of photoetched details by Voyager and decals by Cartograph, neither of which I would expect to find in the Italian boxing. Sorry about the glare, but you know what the model looks like. The cat's name is Rory (as in Mr. Amy Pond). This kit was very inexpensive, Lucky Model's deal of the month or whatnot. A little history of this kit: Italeri (then Italaerei) bought the molds for this kit from Peerless/Max when they went out of business in the 1970s. Peerless Max is probably best known for their kits of various U.S. Army subjects in the range between the Jeep and the deuce-and-a-half (Italaerei bought a bunch of these molds, too). I never knew about their RSO since I don't remember seeing Peerless/Max kits at the 5 and dime where I bought models back then. But the Peerless/Max kits, while primitive by today's standards, are still pretty impressively detailed and engineered kits, and AFAIK pretty accurate.

A major reason I bought this kit was that I already had the Fruil tracks for it. Someone had tossed them into the table of parts for the Iron Modeler competition at Wonderfest. The stuff was free to all takers once the competition was concluded. Since I build armor also, I snatched these up.


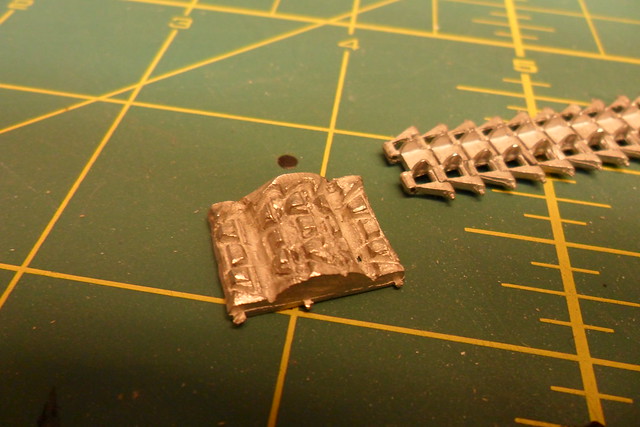
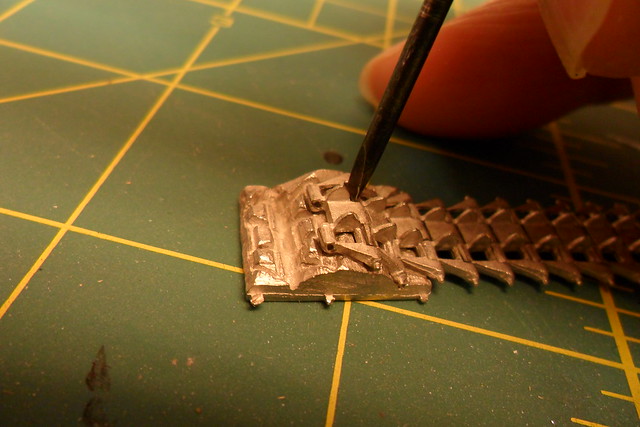
At right you see the assembly fixture, followed by a picture in which I demonstrate how to use the fixture. These tracks are not what I expected: there is no wire to form track pins. Instead, the track pins are cast as part of each link. The part of each link that is like a hinge barrel is open so it can trap the pin in the next link. You place the assembly on the fixture and press the open barrel shut (here I'm doing it with a jeweler's screwdriver), and you get workable track.

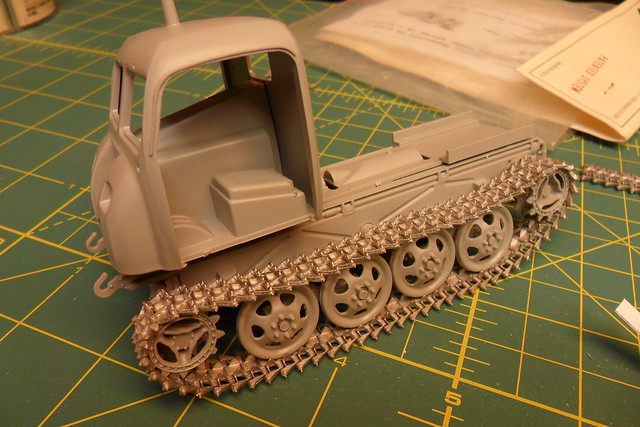
Here's one run of track test fitted on the tractor. They look pretty good here, but I had to cut out a couple links in which the pins broke, probably because I closed the links together with too much force. PMMS has a review of Fruil's track set for the RSO, but it's for a new version, which confusingly has the same number of ATL-29. The differences are that the new links are more accurate, that they have wire for link pins and bolt head parts to make right- and left-hand tracks, and that sprockets are included. The new set apparently takes 69 links per run. I don't have the Panzer Tracts for the RSO, so I don't know how many links it should take. I looked at the best photo I could find of a real RSO and tried to count the number of links, and it seemed to be 72. The run I assembled took 67 links.

Since there are two versions of Fruil's track set ATL-29, you may get the old set when you think you're ordering the new set. However, I'm pretty happy with the old set. They are a bit wider to fit the wider kit sprockets, but the difference in width is kind of hard to see. Once I got the hang of assembling them, it was a breeze. True, the bolt heads on the link pins aren't there, but to my eye these are too large on the new track set. All in all, I don't see a lot of reason to prefer the new set over the old.