Showing posts with label photoetch. Show all posts

Monday, May 20, 2013

KBoP Part 21: Completed! And at Wonderfest 2013

There are more pictures of this model at Modelers Miniatures and Magic.

Here's a bit of video I shot at Wonderfest of the finished KBoP to show the lighting effects. Doesn't quite show all the lighting but I'll post more later. I was shocked when it won Gold in the Vehicles category and Best Round 2 Model Kit Adult Division. I knew darned well what things were wrong with this build--maybe they're minor but there are plenty of defects. I guess the fact that it's a Klingon ship let me get away with things that would be unacceptable on a Federation ship.

Halleluia! Blogger and YouTube are talking to each other again, so I can embed my video. It's always the kids who get hurt when the parents can't get along. Here's another short video showing all of the lighting effects. In Deutschland ist dieses Video möglich gesperrt wegen des Urheberrechts der Musik. Sie ist Beethovens Symphonie Nr. 7, zweiter Satz. (I really like Beethoven's Symphony No. 7, especially the second movement, and it sounds a lot better than what the video camera recorded: my breathing and air conditioner noise.)

Here's a longer video that shows all the lighting effects along with my boring narration where I explain the things I did with this model.


As I said, I'll take more pictures and video and add them to this blog post in the next few days. I actually finished this model on Saturday morning in my room at the Crowne Plaza upstairs from Wonderfest, and what photos I took were of other people's stuff.

Tuesday, May 7, 2013

KBoP Part 19

I put the wings on. I notice a slight asymmetry in the fit, but at this point I'm not going to do anything about it. A side effect of installing lighting is it makes construction a real pain and correcting fit issues becomes more trouble than normal.
There are some kind of vent-looking things on either side of the top of the engine deck. The recessed detail looked a little plain, so I dressed it up with photoetched parts on both sides. (From the spares box--it's 1/700 ship ladders.)
Finally, all of the lighting is soldered together. Here I have one 9V battery powering all of the lighting at once, and hooray! everything still works. I have yet to route some of the fiber optic, then carefully close up the hull halves. Then all that's left to do on this bird is finish up the outside.

Tuesday, April 2, 2013

KBoP Part 14

Previously on Klingon Bird of Prey...

Did I say next time I'd finish the lighting and close her up? If I did, I lied again. Instead I've been ensuring that this project will go on longer than I hoped, by incorporating more detail that I had planned on.

I decided with all the detail packed into other areas of the ship, the forward hull needed some more attention. There's a hatch on top, which is used in ST:IV, and although the movie set is a poor match for the filming miniature (there is no way to reconcile the differences), there is a hatch on it too. At the size stated by Nilo Rodis, the hatch on the filming miniature is a lot bigger, but of course the set was built smaller. This is nothing unusual, since movie audiences aren't equipped to make precise size comparisons. Fans figure this stuff out later with screen grabs and CAD software and such.

The hatch is about a scale six feet in diameter on this model, pretty generous! The series of pictures at right shows how my approach to adding an open hatch and some interior detail evolved along the way. My first thought was to score around the inside of the raised ring to remove the hatch, in hopes of using it. I've tried this kind of thing before and it generally doesn't work, especially removing such a small part. At worst, it's good practice at precise cutting.


Here's the opened hatch, and as you can see, the raised ring was damaged by the cutting.

My first thought was to re-establish the raised ring, and build up a round airlock, using this vinyl hex tubing. Where'd I get it? It's the rod that you twist to operate miniblinds.

I wasn't too happy with how that was going so I made a replacement ring from brass tubing. To do this, I jury-rigged a lathe. I chucked the brass tubing in my drill press and ran it down into a hole of matching diameter I drilled in a wood block clamped to the table. I ran the tubing into the hole a distance equal to the width I wanted for the ring. This way the wood block provided a steady support so I could use the tip of a #10 blade as a parting tool. I turned on the drill press, a neat little curlicue of brass came off, and into the hole dropped this neat little brass ring. Well, not perfectly neat: I deburred it with a sharp #11 blade.

I also made a replacement for the hatch, shown here on my fingertip with the original. I used the same diameter brass tubing to punch out a disc of sheet styrene. The original hatch also has a small disk-shaped projection near the edge. I reproduced this with a thin slice of styrene rod, which I glued in place over a hole I drilled, which helped with locating the little disc properly and will provide an attachment point for the hatch. I recall Panther tanks had a hatch that went up a little on a vertical shaft near the edge and then rotated out of the way. This hatch will open that way.

I forgot to mention, there's another ring of brass tubing inside the aforementioned one. It gives more detail and provides a ledge to support the hatch when it's closed. At right is the hatch in the closed position. I just wanted to verify it would fit; it was pretty tight.


Here's how I ended up using the bit from the miniblind. I hollowed out a hatch using my drill press as a crude milling machine and scribed a slot around this opening for a sliding door which won't be needed as the door will be shown open. Then I cut the piece to length and shaped the top to the inside curve of the forward hull where it will go, filed out a slot for a photoetched ladder, which I folded and superglued in place, and primered the whole thing.

Next time: I'll finish up with the hatch and maybe one or two other detailing goodies on the forward hull, then get all the lighting installed and close this baby up. I hope.

Saturday, July 21, 2012

Tiny Enterprise Bridge Finished, or PGMS Cutaway Starship Photoetch Set, Part 7

Superdetailed bridge from AMT Cutaway Enterprise with coins for size reference. Yes, it's small.
Since last time...

Finished, as in I've had enough frustration and I've got other modeling projects I am impatient to get back to. That sounds disgruntled, but actually this was a pretty good learning experience. It was an impulsive mistake to paint the figures before bending them, and some of the paint came off. I had a little trouble bending the figures into the desired poses. In particular, the bend at the hips for a seated figure tended to come out too low. As a result, I have a better idea of how to get the bend to come out where I want it. Holding the figures with tweezers and dipping their feet in superglue worked pretty well, but I needed to be more patient about placing them. Amazingly, none of the ten figures were eaten by the carpet monster!

Friday, July 20, 2012

Eentsy Weentsy People for the Enterprise Bridge , or PGMS Cutaway Starship Photo-etch Set, Part 6

Finally, I've gotten back to the tiny Enterprise bridge I was detailing with parts from the PGMS Cutaway Starship photo-etch set. Last time, I'd painted it. I've been painting it some more, for the most part clumsily attempting to fix my sloppy work.

Soon, it'll be time to populate the bridge. I've been painting some Gold Medal Models 1/700 photoetch sailors in Starfleet uniforms, and they'll be about the perfect size. I painted them on the fret, since it'll be impossible to paint them after they're removed. Some of the figures will need to be bent, as well, since i intend for Kirk, Sulu, Chekov, and Uhura to be seated. I made sure to take photos of the painted figures before removing them from the fret--I'll take every precaution, but the carpet monster is voracious!

Sunday, May 20, 2012

Painting the Enterprise Bridge, or PGMS Cutaway Starship Photo-etch Set, Part 5


Since last time, I decided I didn't like how the navigation/helm console in the kit part isn't undercut. (You may have noticed it's supported only in the center, so the ends hang out over the helmsman's and navigator's legs.) The captain's chair also needed to be undercut, as it sits on a swivel pedestal. It would have been easier to fix this right at the beginning, and it was very risky to do it now with all the added detail, but it seemed necessary. I hollowed out these parts using both a Dremel tool on its lowest speed with a #80 carbide bit, and various x-acto blades, then puttied it. The whole time I was looking at it through a jeweler's loupe that kept falling out of my eye socket. Luckily, the procedure didn't damage any of the added detail, and the shapes of the console and chair are somewhat more accurate now.

Also, the main viewer and all the port side viewscreens were open holes, so I superglued bits of sheet styrene in back of them.
Then it was time to paint! Yay! That's the fun part. Well, in this case, it's also the most frustrating part. Imagine you've just built the AMT Enterprise bridge set and now you're going to paint it, but to make things challenging, you have to paint it from across the room looking through binoculars, using a long-handled brush so big you could paint the captain's chair with one stroke. I used various colors I had in stock, including Polly Scale RLM 65 for the chairs (like most hobby paints, it's not faithful to the Luftwaffe color, but it's about perfect here).

There's still need for touch-up and a bit more detailing, then it's time to add figures. I have a fret of Gold Medal Models 1/700 scale sailors that you may have spotted lying next to the bridge in previous posts. Some of them will be bent into seated positions and others left standing, then they'll get their Starfleet uniforms painted on and get superglued in place.

Friday, May 18, 2012

Tiny Enterprise Bridge Gets Eentsy Weentsy Chairs, or PGMS Cutaway Starship Photo-etch Set, Part 4

All right, I've done it! Since last time, I made ten Burke chairs at approximately 1/700 scale (to go with the PE figures that will also be on the Cutaway Enterprise bridge, chosen to match the height of the turbolift door). And they're installed. Once they're carefully painted, Lts. Uhura and Sulu, Ens. Chekov, and Mr. Spock will all have places to sit. (Ever notice Scotty doesn't sit much when he's on the bridge? That guy has ants in his pants!) This pic makes me notice something, though. That captain's chair looks like a loveseat! ("Yeoman Rand! Report to the bridge, and bring some Saurian brandy!")


Friday, May 11, 2012

PGMS Cutaway Starship Photo-etch Set, Part 3

(Previously on PGMS Cutaway etc.)

Tonight's episode: Adding handrails

Note: I should mention that the handrails are not part of the ParaGraphix photoetch set.

One of the distinctive features of the Enterprise bridge is the handrail around the center well. I couldn't very well make this tiny bridge (under one inch in diameter!) without adding the handrail. The first step was to drill holes for the stanchions. I used a pin vise with a #75 drill bit, that being the smallest bit I still have for the pin vise. (Tiny bits break so easily. I really need to get a new #61-80 set.) Here are the holes. Not perfectly positioned, but all the while I was thinking about how to do this better. I could rig up a rotary vise and a fixture to hold the pin vise so all the holes are equidistant from the center and at the same angle.

The next job was to thread wire through the holes to form the stanchions. First I tried a piece of steel wire I found in the drawer, but it was very hard to cut and there wasn't enough anyway. I think the wire was the remains of a #76 drill bit. Then I switched to using fine strands of copper wire I stripped out of some old speaker wire. I fed them in through the bottom and tried to get each one to come out the same length before bending the excess length over and supergluing it to the bottom. This wasn't too hard; again, I could do it better by precisely controlling the length of wire protruding through the floor. One way I thought of was painting the desired length on the end of the wire to mark it. It was also necessary to make all the stanchions stand at the right angle--they are angled in a bit.

Last was the trickiest part. I had to cut four handrails to length, bend them into shape, put a droplet of superglue on top of each stanchion, and somehow pick up the piece of handrail and position it. I ended up losing 3 or 4 pieces of handrail, and immediately set to work each time fabricating a replacement, as there was no point in looking for anything that tiny. I used pointy tweezers to pick up the handrails and had to lick the tweezers or the parts would disappear almost as soon as they were picked up.

Finally, I got all the handrails in place. It took a bit of patience and definitely made me think of ways to get better results.
Next time I think I'll be making a bunch of tiny Burke chairs.

Wednesday, May 9, 2012

PGMS Cutaway Starship Photo-etch Set, Part 2


Okay, as promised I worked on the Cutaway Enterprise bridge within 48 hours of my last post. (Actually, I promised to try. And did it anyway. Take that, Yoda!) Here are some pics of where this project stands right now. To find out how it got to this point..

Monday, May 7, 2012

PGMS Cutaway Starship Photo-etch Set, Part 1

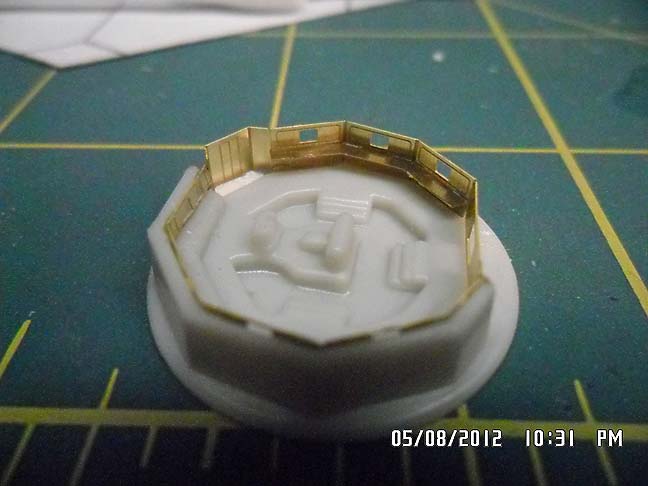
Guess what just came in the mail? The new photo-etch set from ParaGrafix Modeling Systems for the AMT cutaway Enterprise (AMT kit 8790)! I got it for free, not 'cause I'm some modeling whiz, but because I won a contest on the Starship Modeler forum. To be nice, I thought I'd show it off so you can consider if you want to get one. Here's what you get:

You get a nice crisp sheet of brass photoetched parts about 4.2" X 5.7", along with a clearly illustrated instruction sheet (printed both sides) with references to the AMT kit parts that the photoetched parts augment or replace. The set comprises parts for the buzzard collector rotors (suitable for motorization), grilles for the inner sides of the warp nacelles and for the upper sides of the warp pylons, the grilles for the sides of the secondary hull on either side of the navigational deflector housing, the bussard collector clamps (those little details, three of which ring the bussard collector dome on the front of each warp nacelle), the rear face of the impulse engine, and a detailing set for the bridge (part 26 in the AMT kit). The parts for the bridge include a replacement for the upper panels around the starboard side of the bridge and a replacement for the missing wall around the port side of the bridge. This includes everything from the turbolift to the main viewer, with consoles.

This is what part 26 looks like on the tree, right next to the port nacelle. You can see there's a whole side missing. Maybe you can't tell, but the captain's chair and the navigation/helm console is there, in the center well. Pretty basic.

I'll be working on just the bridge for an upcoming post. Hopefully, it will be up in the next 48 hours.