I gave the model its first coat of primer. A relatively hard thing to fix is the loss of saucer edge detail near this RCS quad. I filled the gap with gel superglue and hit it with accelerant, then sanded and added more. I also puttied. After it's primered again, we'll see how much more work it needs so that the repair is unnoticeable.
Some areas don't need much help. Here you see only two little spots of putty on the saucer underside.
The edge of the engineering hull behind the saucer edge has a more serious defect, what appears to be a two-part mold problem. The area just needs the usual filling, sanding, primering ad infinitum.
The largest bubbles and some more two-part molding defects were on the warp nacelles. Nothing too bad.
Pretty much the same thing as the other pic of the engineering hull, eh?
Next time: all primered up and smooth and ready for painting. But it's going to have to wait two weeks till after vacation.
Reality is a concept firmly rooted in the imagination. This blog is a pretty much imaginary place for me to showcase my attempts to represent in reality some of the things that have come to live in my imagination.
Friday, July 5, 2013
1/1400 Saber-class NCC-81623 USS Da VInci, Part 2
Thursday, July 4, 2013
1/1400 Saber-class NCC-81623 USS Da Vinci
Here's the beginning of a new project I hope will be brief. I acquired a Starcraft 1/1400 scale Saber. It's one of the new starship classes seen in Star Trek: First Contact. In the Starfleet Corps of Engineers books, most of the action takes place on one of these ships, USS Da Vinci NCC-81623, which this model will represent.
EDIT (28Feb2014): I've heard from another modeler who used Klean Strip on resin and it ate into the resin. Like the advice given on a lot of products, test on an inconspicuous area to make sure it's safe. This product also works really fast, so you should not have to leave it on long.
Since the kit was previously finished, the old paint had to go. The paint stripper really looks like vomit, but has a very different nasty smell.

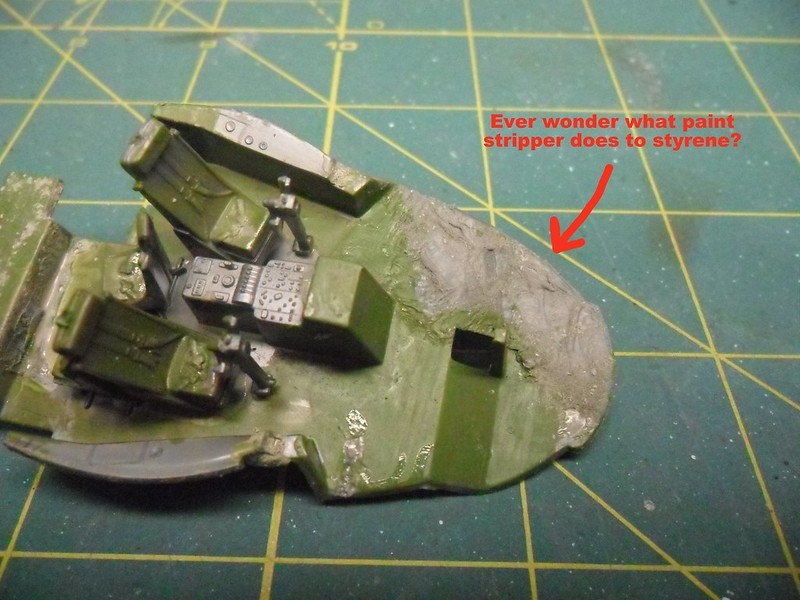
Incidentally, it was possible to use this stripper only because this model is resin. Out of scientific curiosity, I put some onto painted styrene. Here's the result:
Here's how it came out after soaking in stripper and scrubbing with a toothbrush dipped in lacquer thinner. Cleans up real nice. It was also possible to pop the nacelles off. I let the joint soak in acetone, then used a pair of slip-joint pliers and a piece of inner tube to pry off the nacelles without marring the surface.

It was bugging me that there are some symmetry problems with this kit. This is an older Starcraft kit and not quite state of the art any more. It was assembled just fine; in fact, there were locating pins for the nacelles. In this picture you can see where I had to sand down a panel that stuck out too far. Easy fix.
The starboard nacelle's pylon overlaps some lifeboats, and the port nacelle's front face is too far forward. Mostly this is an easy fix also, requiring just a bit of sanding. The mating surface to the pylon on the underside of the saucer, however, is a bit proud of the surface and needs to be carefully sanded to avoid wiping out the lifeboat detail. In fact, I had to re-establish some of this detail by scraping with an x-acto blade and using a scribing tool.
Here it is fixed. You can also see a dark stain on the underside of the saucer. Looking at it closely, I realized it's composed of paint that filled in thousands of tiny bubbles, and it won't be visible once it's primered. Another symmetry problem that needs to be addressed is the dogtooth detail on the leading edge of the saucer. A little bit of sanding will rectify this.
Next time: Primering and filling and sanding, oh my!
EDIT (28Feb2014): I've heard from another modeler who used Klean Strip on resin and it ate into the resin. Like the advice given on a lot of products, test on an inconspicuous area to make sure it's safe. This product also works really fast, so you should not have to leave it on long.
Since the kit was previously finished, the old paint had to go. The paint stripper really looks like vomit, but has a very different nasty smell.
Incidentally, it was possible to use this stripper only because this model is resin. Out of scientific curiosity, I put some onto painted styrene. Here's the result:
It strips the paint, then turns the plastic into taffy. Back to the Saber...
Here's how it came out after soaking in stripper and scrubbing with a toothbrush dipped in lacquer thinner. Cleans up real nice. It was also possible to pop the nacelles off. I let the joint soak in acetone, then used a pair of slip-joint pliers and a piece of inner tube to pry off the nacelles without marring the surface.
It was bugging me that there are some symmetry problems with this kit. This is an older Starcraft kit and not quite state of the art any more. It was assembled just fine; in fact, there were locating pins for the nacelles. In this picture you can see where I had to sand down a panel that stuck out too far. Easy fix.
The starboard nacelle's pylon overlaps some lifeboats, and the port nacelle's front face is too far forward. Mostly this is an easy fix also, requiring just a bit of sanding. The mating surface to the pylon on the underside of the saucer, however, is a bit proud of the surface and needs to be carefully sanded to avoid wiping out the lifeboat detail. In fact, I had to re-establish some of this detail by scraping with an x-acto blade and using a scribing tool.
Here it is fixed. You can also see a dark stain on the underside of the saucer. Looking at it closely, I realized it's composed of paint that filled in thousands of tiny bubbles, and it won't be visible once it's primered. Another symmetry problem that needs to be addressed is the dogtooth detail on the leading edge of the saucer. A little bit of sanding will rectify this.
Next time: Primering and filling and sanding, oh my!
Tuesday, July 2, 2013
baQa'! pay' QapHa'taH beghwIj 'ach vItI'laHbe'!
Translation: Damn! Suddenly my deflector is malfunctioning but I can't fix it!
One of the LEDs burned out, so the deflector ring is wov on one side but wovHa' on the other. There's no way I can get in there to fix it. At least the poS side isn't completely Hurgh. Do'Ha'!
EDIT: There was a grammatical error in the title. The subject noun beghwIj ("my deflector") should not have preceded the predicate verb QapHa' ("malfunctions"), so I fixed it. I also made the verb QapHa' into QapHa'taH ("is malfunctioning"), since the malfunction is ongoing. Also there is an error in the lower callout in the photo. I copied and pasted from Bing to MSPaint. Apparently due to different coding between Bing and the pIqaD font I have loaded, the pIqaD came out different. Fortunately, most of us (myself included) can't read it. Of course, now that this happened, I'll have to learn how to read Klingon in pIqaD.
One of the LEDs burned out, so the deflector ring is wov on one side but wovHa' on the other. There's no way I can get in there to fix it. At least the poS side isn't completely Hurgh. Do'Ha'!
EDIT: There was a grammatical error in the title. The subject noun beghwIj ("my deflector") should not have preceded the predicate verb QapHa' ("malfunctions"), so I fixed it. I also made the verb QapHa' into QapHa'taH ("is malfunctioning"), since the malfunction is ongoing. Also there is an error in the lower callout in the photo. I copied and pasted from Bing to MSPaint. Apparently due to different coding between Bing and the pIqaD font I have loaded, the pIqaD came out different. Fortunately, most of us (myself included) can't read it. Of course, now that this happened, I'll have to learn how to read Klingon in pIqaD.
Sunday, June 2, 2013
Yamato 2199 Size Chart
Here's a size chart I found somewhere of most of the ships seen early on in Space Battleship Yamato 2199. I just added the transliterated names of ships. There's more info in a previous post and at the official website (here's the mecha page). Unfortunately, if you can't read Japanese you'll have just as much trouble as I do understanding the official webpage. The American fan site is Cosmo DNA. This replaced StarBlazers.com, which you may remember and which is now accessible through the Wayback Machine. Go check that out to find stuff that still isn't at Cosmo DNA. Just remember to set the Wayback Machine to the year 2012 or earlier!
Monday, May 20, 2013
KBoP Part 21: Completed! And at Wonderfest 2013
There are more pictures of this model at Modelers Miniatures and Magic.
Here's a bit of video I shot at Wonderfest of the finished KBoP to show the lighting effects. Doesn't quite show all the lighting but I'll post more later. I was shocked when it won Gold in the Vehicles category and Best Round 2 Model Kit Adult Division. I knew darned well what things were wrong with this build--maybe they're minor but there are plenty of defects. I guess the fact that it's a Klingon ship let me get away with things that would be unacceptable on a Federation ship.
Halleluia! Blogger and YouTube are talking to each other again, so I can embed my video. It's always the kids who get hurt when the parents can't get along. Here's another short video showing all of the lighting effects. In Deutschland ist dieses Video möglich gesperrt wegen des Urheberrechts der Musik. Sie ist Beethovens Symphonie Nr. 7, zweiter Satz. (I really like Beethoven's Symphony No. 7, especially the second movement, and it sounds a lot better than what the video camera recorded: my breathing and air conditioner noise.)
Here's a longer video that shows all the lighting effects along with my boring narration where I explain the things I did with this model.
Wednesday, May 15, 2013
KBoP Part 20
Quick update as I am frantically trying to get this done before leaving tomorrow to go to Wonderfest.
Here's the wings on. No disruptor cannons yet so it can't go "Pew, pew, pew!"

I have painted lots of KBoPs already. I don't need another one with red wings on the underside. Besides, that's a Romulan thing. Klingons' favorite color is green. Okay, red if it's spilling out of humans, but I mean ship colors.
The blank side of the landing gear doors will show, and Round 2 put nothing on them except ejector pin marks. So I hollowed them out a bit and added styrene detail before painting and weathering.
Here's the wings on. No disruptor cannons yet so it can't go "Pew, pew, pew!"

I have painted lots of KBoPs already. I don't need another one with red wings on the underside. Besides, that's a Romulan thing. Klingons' favorite color is green. Okay, red if it's spilling out of humans, but I mean ship colors.
The blank side of the landing gear doors will show, and Round 2 put nothing on them except ejector pin marks. So I hollowed them out a bit and added styrene detail before painting and weathering.
Tuesday, May 7, 2013
KBoP Part 19
I put the wings on. I notice a slight asymmetry in the fit, but at this point I'm not going to do anything about it. A side effect of installing lighting is it makes construction a real pain and correcting fit issues becomes more trouble than normal.
There are some kind of vent-looking things on either side of the top of the engine deck. The recessed detail looked a little plain, so I dressed it up with photoetched parts on both sides. (From the spares box--it's 1/700 ship ladders.)
Finally, all of the lighting is soldered together. Here I have one 9V battery powering all of the lighting at once, and hooray! everything still works. I have yet to route some of the fiber optic, then carefully close up the hull halves. Then all that's left to do on this bird is finish up the outside.
There are some kind of vent-looking things on either side of the top of the engine deck. The recessed detail looked a little plain, so I dressed it up with photoetched parts on both sides. (From the spares box--it's 1/700 ship ladders.)
Finally, all of the lighting is soldered together. Here I have one 9V battery powering all of the lighting at once, and hooray! everything still works. I have yet to route some of the fiber optic, then carefully close up the hull halves. Then all that's left to do on this bird is finish up the outside.
Subscribe to:
Posts (Atom)